Airtable Integration Guide
Learn how to integrate PDFBolt with Airtable to automate PDF generation directly from your bases using Airtable's automation capabilities.
Prerequisites
Before starting, ensure you have:
- PDFBolt API Key
- Sign up or log in to your PDFBolt account.
- Navigate to the API Credentials section.
- Copy your API key for authentication.
- Airtable Account
- Active Airtable workspace.
Choose Your Endpoint
Select the PDFBolt endpoint based on your app's needs:
| Endpoint | Best For | Returns |
|---|---|---|
/v1/direct | Immediate PDF delivery | Raw PDF data in response |
/v1/sync | URL-based access | JSON with download URL (valid for 24 hours) |
/v1/async | Background processing | Webhook callback with results (paid plans only) |
See API Endpoints for detailed specifications.
Choose Your Source
Select the content source that best fits your use case:
| Source | Best For | When to Use |
|---|---|---|
| Templates | Recurring documents with consistent layouts | Certificates, invoices, receipts – any document you generate repeatedly with different data |
| HTML | Custom documents | When you need full control over a unique layout |
| URL | Existing web pages | Archiving documentation, reports, capturing dashboards, saving public web pages |
Learn more about source parameters in the API Documentation.
Source: Templates
Templates provide the most efficient way to generate consistent, branded PDFs by separating design from data.
How It Works
- Create your template in the Dashboard Template Designer or through the Template API:
- Build custom layouts with HTML, CSS, and Handlebars variables.
- Pick a ready-made template from the template gallery.
- Or generate one with AI from a description or reference file.
-
Publish for API access and get your
templateId. -
Map Airtable fields to template variables using a script.
-
Receive your PDF – PDFBolt merges record data with your template.
Example: Event Ticket Generation
Real-world scenario: You're organizing a conference. Instead of manually creating tickets, you need an automated system where someone fills out a registration form and immediately receives their ticket PDF with a QR code via email.
Step 1: Database Setup
In our example, we will use a Registrations table with the following sample fields:

Optional: Create an Events table to store event information:
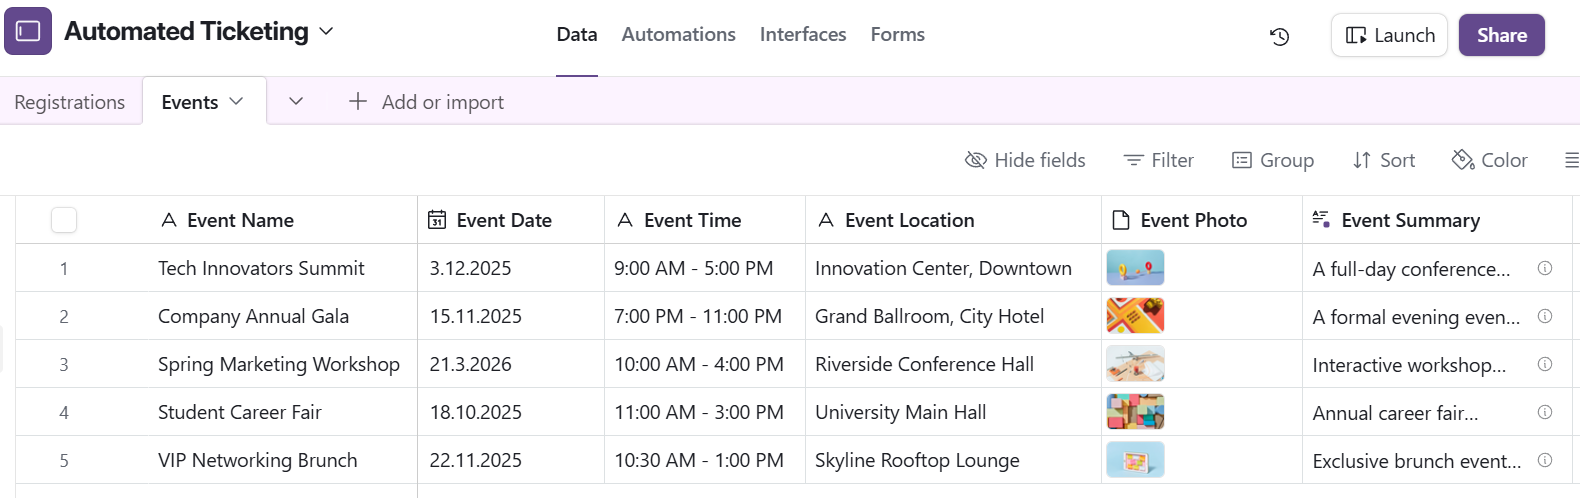
The Event field in the Registrations table must be a linked record field connecting to the Events table. This allows each registration to be associated with a specific event. See Airtable's guide on linked records for setup instructions.
Step 2: Registration Form
In this example, a new record in the table will be created each time the form is submitted:
- Turn your table into a public registration form by selecting the fields to display.
- Share the form URL on your event website or in marketing emails.
- Each submission will automatically create a new record and trigger the automation.
Step 3: Automation Configuration
Navigate to the Automations tab in your Airtable base and create a new automation:
Trigger Setup:
- Trigger type: When record created
- Table:
Registrations
This fires immediately when someone submits the registration form.
Action 1: Run a script (Generate Ticket)
Click Add action → Select Run a script
Before pasting the code, you must configure input variables:
- Under "Inputs", click + Add input variable.
- Configure the input:
- Name:
recordId - Value: Select
Airtable record ID
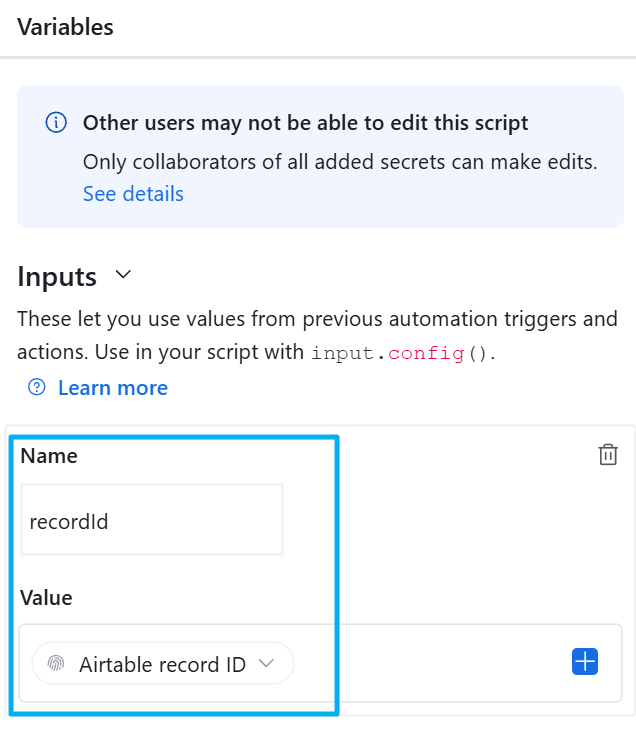
Airtable Inputs let you use values from previous automation triggers and actions. Access them in your script using input.config(). This passes the newly created record's ID to the script.
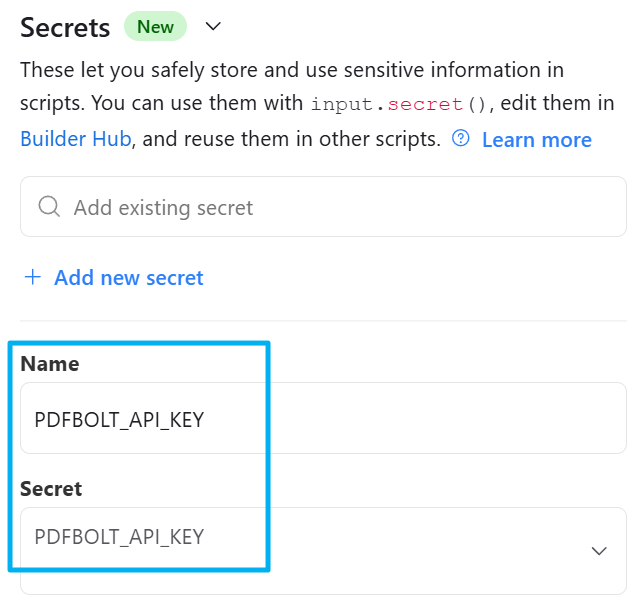
Secure API Key Storage with Secrets:
Instead of hardcoding your API key in the script, use Airtable's Secrets feature:
- Click + Add new secret
- Name:
PDFBOLT_API_KEY - Value: Paste your actual API key.
Then update your script to use the variable:
const apiKey = input.secret('PDFBOLT_API_KEY')
Airtable's Secret variable type lets you securely store and use sensitive information in scripts without exposing it in code. This is the recommended approach for API keys and other credentials.
Script Implementation:
View Code
// PDFBolt API configuration
const TEMPLATE_ID = 'your-template-id';

let config = input.config();
let recordId = config.recordId;
const apiKey = input.secret('PDFBOLT_API_KEY');

let tableRegistrations = base.getTable("Registrations");
let record = await tableRegistrations.selectRecordAsync(recordId);

// Get event information from Events table
let tableEvents = base.getTable("Events");
let linkedEvent = record.getCellValue('Event');
let eventRecord = await tableEvents.selectRecordAsync(linkedEvent[0].id);

// Extract registration data
const attendeeData = {
  attendee_name: record.getCellValueAsString('Full Name'),
  email: record.getCellValueAsString('Email'),
  company: record.getCellValueAsString('Company') || 'N/A',
  ticket_type: record.getCellValueAsString('Ticket Type'),
  qr_code: record.getCellValueAsString('QR Code'),
  event_name: eventRecord.getCellValueAsString('Event Name'),
  event_date: eventRecord.getCellValueAsString('Event Date'),
  event_time: eventRecord.getCellValueAsString('Event Time'),
  event_location: eventRecord.getCellValueAsString('Event Location'),
};

// Call PDFBolt API
try {
  const response = await fetch('https://api.pdfbolt.com/v1/sync', {
    method: 'POST',
    headers: {
      'API-KEY': apiKey,
      'Content-Type': 'application/json'
    },
    body: JSON.stringify({
      templateId: TEMPLATE_ID,
      templateData: attendeeData
    })
  });

  const result = await response.json();

  if (response.ok && result.documentUrl) {
    await tableRegistrations.updateRecordAsync(record.id, {
      'Ticket Status': {name: 'Generated'},
      'Ticket PDF': result.documentUrl
    });

    output.set('ticketUrl', result.documentUrl);

  } else {
    throw new Error(result.errorMessage || 'Failed to generate ticket');
  }
} catch (error) {
  console.error('Error:', error.message);

  await tableRegistrations.updateRecordAsync(record.id, {
    'Ticket Status': {name: 'Failed'}
  });

  throw error;
}
Understanding the script:
- Data Collection: Fetches the newly created attendee record via
input.config()and extracts field values. - PDF Generation: Sends data to PDFBolt API which merges it with your template.
- Record Update: Stores the PDF URL back in Airtable.
Action 2: Send email
- Add another action → Select Gmail: Send email (or your preferred email service). Configure the step with recipients, subject, and message.
- In the message, include the
ticketUrlgenerated by the script so the attendee can download it.
The ticketUrl comes from output.set('ticketUrl', result.documentUrl) in the script. Select it from the "Run a script" step dropdown when configuring the email body.
Complete Automations Workflow

High volume: Use /v1/async endpoint instead of /v1/sync for better performance (paid plans only).
Long-term storage: Use customS3PresignedUrl parameter to store PDFs on your S3 bucket (default URLs expire after 24h). See S3 Bucket Upload.
Additional Resources
PDFBolt Documentation
- Template Management Guide – Create and manage templates.
- Templates Overview – Template concepts, benefits, and use cases.
- API Endpoints – Complete endpoint reference.
- Conversion Parameters – Full parameter documentation.
- Error Handling – Error codes and solutions.
- S3 Bucket Upload – Store PDFs permanently.