Zapier Integration Guide
Learn how to connect PDFBolt with Zapier for automated PDF creation in your workflows. Build professional documents from templates, HTML content, or web pages through Zapier's no-code automation interface.
Prerequisites
Before starting, ensure you have:
- PDFBolt API Key
- Sign up or log in to your PDFBolt account.
- Navigate to the API Credentials section.
- Copy your API key for authentication.
- Zapier Account
- Active Zapier account (free or paid plan).
Basic Setup
Configure Webhooks by Zapier
Connect to PDFBolt's API using Zapier's Webhooks action:
-
In your Zap, add an action step and search for Webhooks by Zapier.
-
Select Custom Request as your action event → Continue.
-
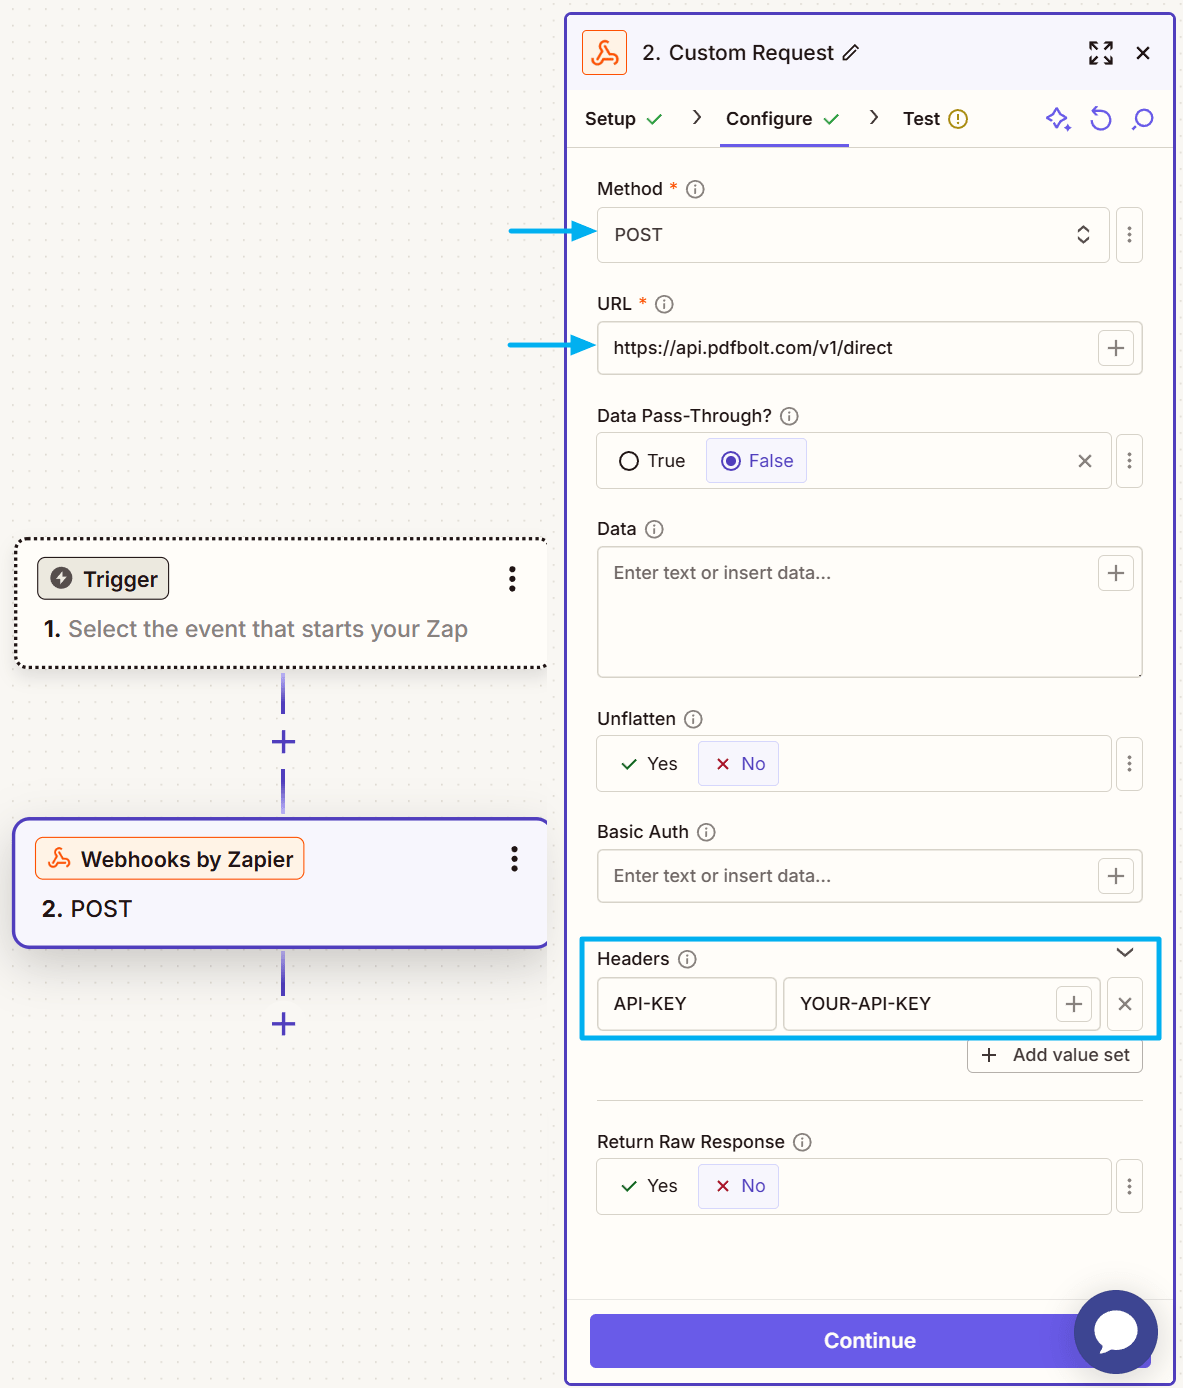
Set up the request parameters:
- Method:
POST - URL:
https://api.pdfbolt.com/v1/direct - Data Pass-Through?
False - Data: (configuration varies by content source – examples provided below)
- Unflatten:
No - Headers:
API-KEY:XXXXXXXX-XXXX-XXXX-XXXX-XXXXXXXXXXXX
Choose Your Endpoint
Select the PDFBolt endpoint based on your workflow needs:
| Endpoint | Best For | Returns |
|---|---|---|
/v1/direct | Immediate PDF delivery | Raw PDF data in response |
/v1/sync | URL-based access | JSON with download URL (valid for 24 hours) |
/v1/async | Background processing | Webhook callback with results (paid plans only) |
See API Endpoints for detailed specifications.
Choose Your Source
Select the content source that best fits your use case:
| Source | Best For | When to Use |
|---|---|---|
| Templates | Recurring documents with consistent layouts | Certificates, receipts, invoices – any document you generate repeatedly with different data |
| HTML | Custom documents | When you need full control over a unique layout |
| URL | Existing web pages | Archiving documentation, reports, capturing dashboards, saving public web pages |
Learn more about source parameters in the API Documentation.
Source 1: Templates
Templates provide the most efficient way to generate consistent, branded PDFs by separating design from data.
How It Works
- Create your template in the Dashboard Template Designer or through the Template API:
- Build custom layouts with HTML, CSS, and Handlebars variables.
- Pick a ready-made template from the template gallery.
- Or generate one with AI from a description or reference file.
-
Publish for API access and get your
templateId. -
Send API request containing just
templateIdandtemplateData. -
Receive your PDF – PDFBolt returns the generated PDF.
Example: Course Completion Certificate
Real-world scenario: A student completes your online course. Automatically generate a personalized completion certificate PDF and email it to them.
Step 1: Set up your trigger (e.g., Google Forms or Teachable for course completion).
Step 2: In Webhooks by Zapier action, configure the Data field:
{
  "templateId": "your-certificate-template-id",
  "templateData": {
    "recipient_name": "{{1. Your Full Name}}",
    "course_title": "{{1. Which course}}",
    "completion_date": "{{1. Last Submitted Time}}",
    "instructor_name": "Prof. Lingua Ford",
    "organization_name": "International Language Center"
  }
}
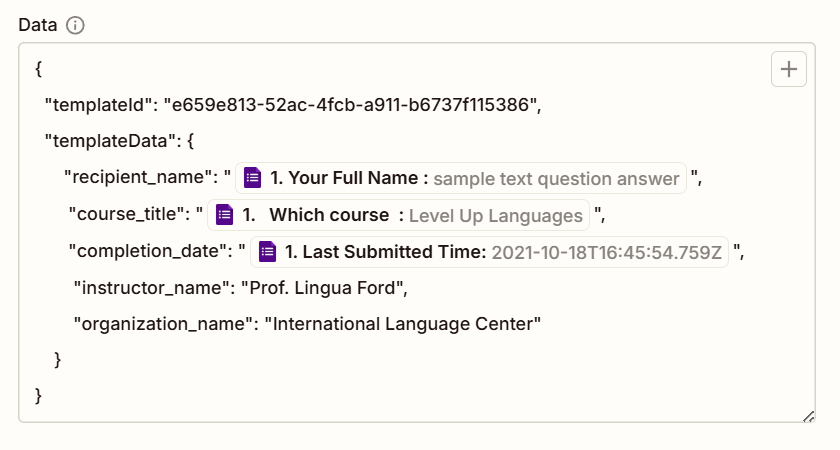
{{1. Field Name}}references data from step 1 (your trigger). To insert dynamic values, click the + icon, search for the field name, and select it.- Step numbers match your Zap sequence position.
- Field names must exactly match your template's Handlebars variables.
- Combine dynamic fields from triggers with static values as needed.
Template Zap Example
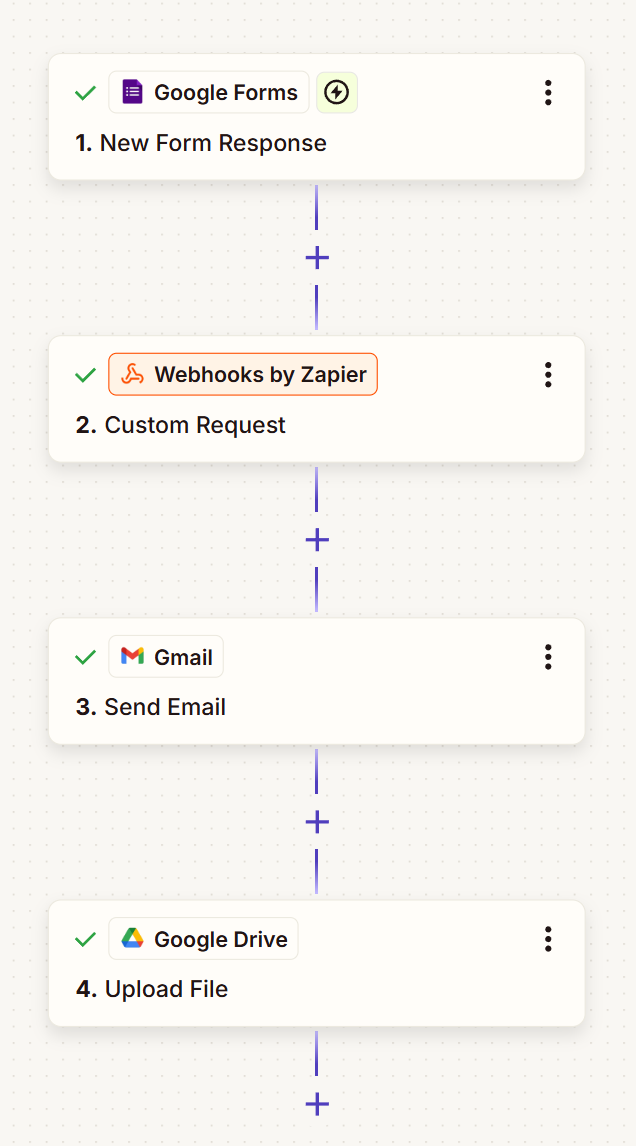
Complete Zap:
- Google Forms: New Response – Student submits completion form.
- Webhooks by Zapier: Custom Request – Creates certificate PDF.
- Gmail: Send Email – Delivers certificate to recipient.
- Google Drive: Upload File – Stores certificate copy.
Apply this pattern with Thinkific, Kajabi, Teachable, or similar platforms available in Zapier. Connect completion triggers to your certificate template variables.
Source 2: HTML
Convert HTML directly into PDFs within your Zaps – useful for event materials, announcements, or custom one-time documents.
How It Works
- Add your HTML content in a Code step.
- Encode HTML to Base64 format.
- Send encoded HTML to PDFBolt.
- Receive your PDF.
PDFBolt requires Base64-encoded HTML. This means you'll need Code by Zapier to encode your HTML before sending it to the Webhooks step.
Example: Event Program
Real-world scenario: You're organizing a webinar or conference and want attendees to download a PDF program with schedule, speakers, and session details.
Step 1: Set up Typeform: New Entry trigger for event registration.
Step 2: Add Code by Zapier action with Run JavaScript.
View Complete Code Example
// Static event program HTML – same for all attendees
const htmlContent = `
<!DOCTYPE html>
<html>
<head>
    <style>
        * {
            margin: 0;
            padding: 0;
            box-sizing: border-box;
        }
        body {
            font-family: Arial;
            color: #333;
            line-height: 1.7;
            margin: 10px;
        }
        .header {
            background: linear-gradient(135deg, #1e293b 0%, #334155 100%);
            color: white;
            padding: 20px;
            text-align: center;
        }
        h1 {
            font-size: 28px;
        }
        .event-info {
            background: #f8fafc;
            padding: 12px 20px;
            border-radius: 8px;
            margin: 20px 0 10px;
        }
        h2 {
            color: #1e293b;
            margin-bottom: 5px;
        }
        .session {
            border-left: 4px solid #f59e0b;
            padding: 10px 20px;
            margin: 15px 0;
            background: #fff;
            border-radius: 4px;
            box-shadow: 1px 1px 10px rgba(0, 0, 0, 0.1);
            page-break-inside: avoid;
        }
        .time {
            color: #b45309;
            font-weight: bold;
            font-size: 14px;
        }
        .speaker {
            color: #64748b;
            font-style: italic;
            margin-top: 5px;
        }
        .break {
            background: #fef3c7;
            padding: 10px;
            text-align: center;
            margin: 15px 0;
            border-radius: 4px;
        }
        .footer {
            margin-top: 20px;
            padding-top: 10px;
            border-top: 2px solid #e2e8f0;
            text-align: center;
            color: #64748b;
        }
    </style>
</head>
<body>
    <div class="header">
        <h1>Tech Summit 2026</h1>
        <p>Building the Future Together</p>
        <p class="date">September 18, 2026 | Virtual Event</p>
    </div>

    <div class="event-info">
        <strong>Event Details:</strong><br/>
        Date: September 18, 2026<br/>
        Time: 9:00 AM - 5:00 PM EST<br/>
        Platform: Zoom (link will be sent via email)
    </div>

    <h2>Event Schedule</h2>

    <div class="session">
        <div class="time">9:00 AM - 10:30 AM</div>
        <strong>Opening Keynote: The Future of AI</strong>
        <div class="speaker">Speaker: Dr. Sarah Johnson, AI Research Director</div>
        <p>Exploring emerging trends in artificial intelligence and their impact on business.</p>
    </div>

    <div class="session">
        <div class="time">10:45 AM - 12:30 PM</div>
        <strong>Workshop: Building Scalable APIs</strong>
        <div class="speaker">Speaker: Mike Chen, Senior Engineer</div>
        <p>Hands-on session covering best practices for API design and implementation.</p>
    </div>

    <div class="break">Lunch Break (12:30 PM - 1:00 PM)</div>

    <div class="session">
        <div class="time">1:00 PM - 2:45 PM</div>
        <strong>Panel Discussion: Cloud Architecture</strong>
        <div class="speaker">Panelists: Various industry experts</div>
        <p>Interactive discussion about modern cloud infrastructure and DevOps practices.</p>
    </div>

    <div class="session">
        <div class="time">3:00 PM - 5:00 PM</div>
        <strong>Security in Production: Lessons Learned</strong>
        <div class="speaker">Speaker: Anna Torres, Head of Security Engineering</div>
        <p>Real-world case studies on securing applications at scale and incident response.</p>
    </div>

    <div class="footer">
        <p><strong>Questions?</strong> Contact us at events@example.com</p>
    </div>
</body>
</html>
`;

// Encode to Base64
const html = Buffer.from(htmlContent).toString('base64');

output = { html };
HTML must be Base64-encoded before sending to PDFBolt. Code by Zapier handles this encoding using Buffer.from(html).toString('base64').
Step 3: Add Webhooks by Zapier: Custom Request.
Configure the Data field:
{
  "html": "{{2. Html}}",
  "format": "A4",
  "printBackground": true,
  "margin": {
    "top": "30px",
    "bottom": "30px",
    "right": "30px",
    "left": "30px"
  }
}
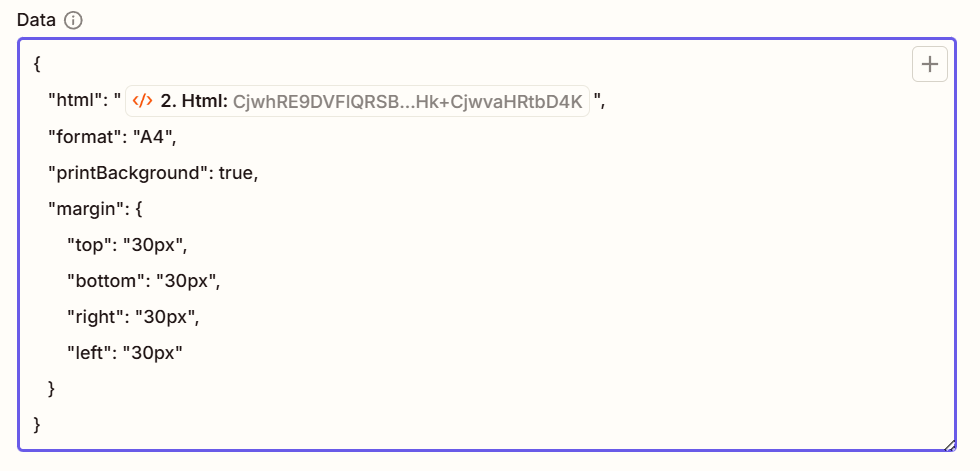
- Click the + icon in the Data field and select
2. Htmlfrom the Code step output. - This passes the Base64-encoded HTML to PDFBolt.
HTML Zap Example
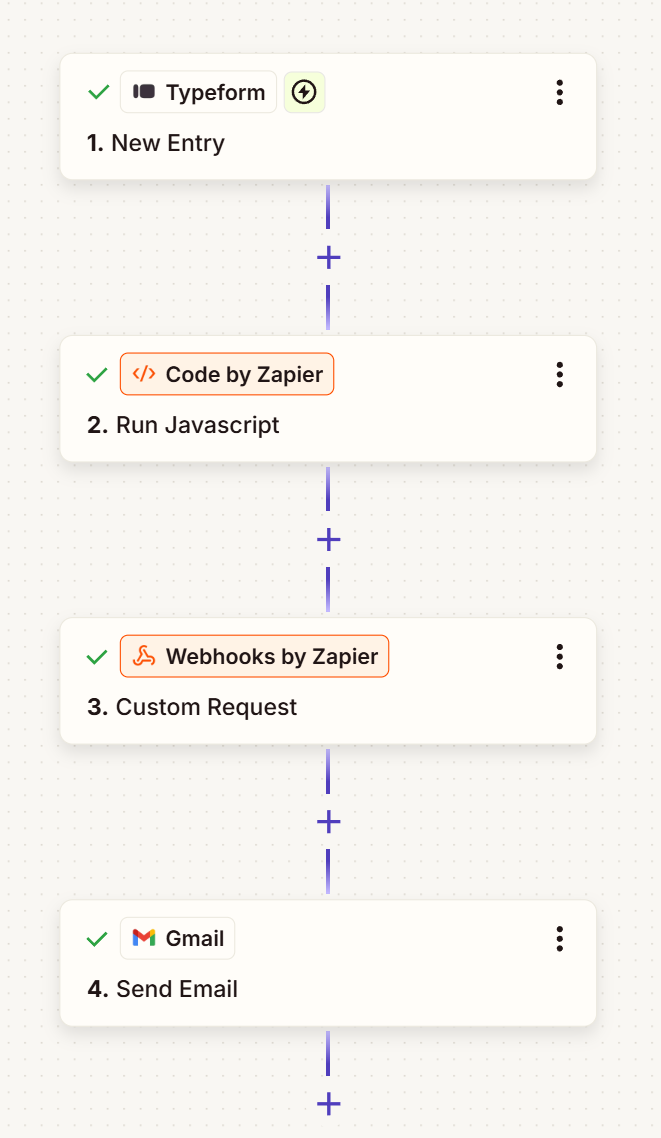
Complete Zap:
- Typeform: New Entry – Registration form submitted.
- Code by Zapier: Run JavaScript – Add and encode HTML.
- Webhooks by Zapier: Custom Request – Generate PDF program.
- Gmail: Send Email – Send confirmation with PDF to attendee.
Adjust PDF formatting by modifying parameters in the Webhooks Data field. See Conversion Parameters for all available options like page size, orientation, and margins.
Source 3: URL
Convert public HTTPS web pages into PDF documents – useful for saving online materials, dashboard snapshots, or archiving reports.
How It Works
- Provide the target webpage URL.
- PDFBolt retrieves and renders the page.
- Returns a PDF.
Example: Daily Dashboard Report
Real-world scenario: Your team tracks metrics on a web-based analytics dashboard. Every weekday morning, automatically capture the dashboard as PDF and share it on Slack so the team stays informed.
Step 1: Set up Schedule by Zapier trigger.
Configure to run every weekday at 8:00 AM.
Step 2: Add Webhooks by Zapier: Custom Request.
Configure the Data field:
{
  "url": "https://analytics.yourcompany.com/dashboard",
  "format": "A4",
  "landscape": true,
  "printBackground": true,
  "waitUntil": "networkidle",
  "margin": {
    "top": "20px",
    "right": "20px",
    "bottom": "20px",
    "left": "20px"
  }
}

For pages requiring variable URLs, construct the URL in previous Zap steps. Reference it using {{Step Number. Field Name}} in the Data field.
waitUntil: "networkidle" ensures all dashboard charts, data, and dynamic content finish loading before PDF capture – essential for accurate snapshots.
URL Zap Example

Complete Zap:
- Schedule by Zapier – Every weekday at 8:00 AM.
- Webhooks by Zapier: Custom Request – Capture dashboard as PDF.
- Slack: Send Channel Message – Share report with team channel.
- Google Drive: Upload File – Archive in Reports folder.
Additional Resources
PDFBolt Documentation
- Template Management Guide – Detailed creation and management instructions.
- Templates Overview – Template concepts, benefits, and use cases.
- API Endpoints – Complete endpoint reference.
- Conversion Parameters – Full parameter documentation.
- Error Handling – Error codes and solutions.
- S3 Bucket Upload – Store PDFs permanently.