Bubble Integration Guide
Learn how to integrate PDFBolt with Bubble.io to automate PDF generation in your no-code applications. Create professional documents from templates, HTML content, or web pages using Bubble's visual workflow builder and API Connector.
Prerequisites
Before starting, ensure you have:
- PDFBolt API Key
- Sign up or log in to your PDFBolt account.
- Navigate to the API Credentials section.
- Copy your API key for authentication.
- Bubble Account
- Active Bubble.io account with an app.
- API Connector plugin installed.
Basic Setup
Install and Configure API Connector
The API Connector plugin enables your Bubble app to communicate with external APIs like PDFBolt.
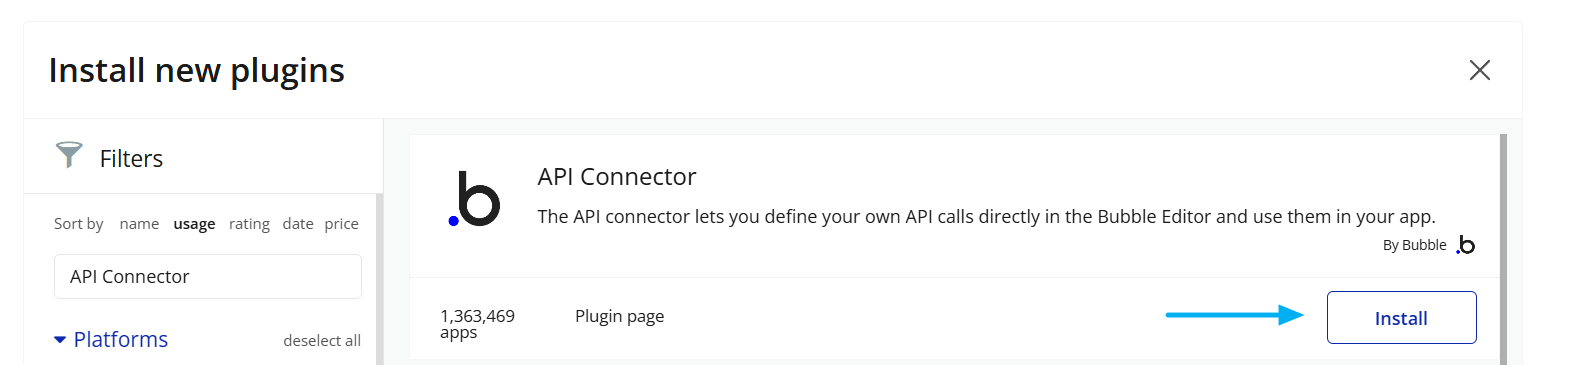
Step 1: Install API Connector Plugin
- In your Bubble editor, go to Plugins tab.
- Click Add plugins.
- Search for API Connector.
- Click Install (it's free on all Bubble plans).
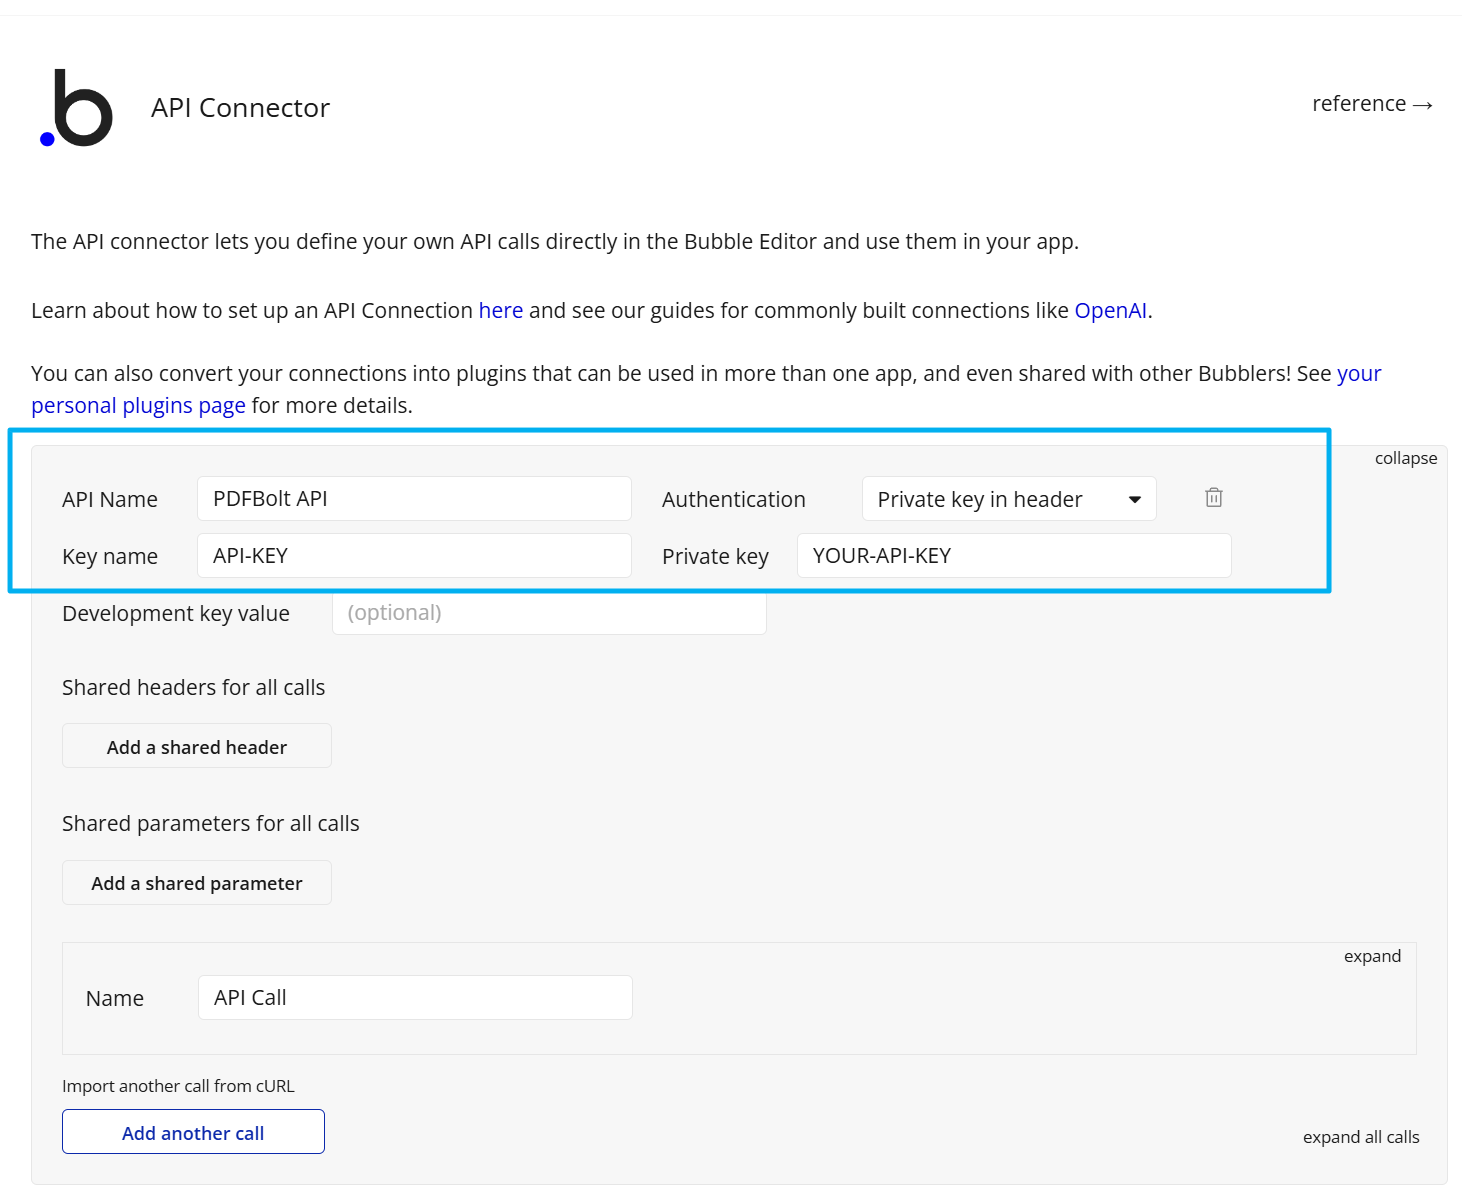
Step 2: Add PDFBolt API Connection
- Go to Plugins → API Connector.
- Click Add another API.
- Configure the API:
- API Name:
PDFBolt - Authentication:
Private key in header - Key name:
API-KEY - Key value:
XXXXXXXX-XXXX-XXXX-XXXX-XXXXXXXXXXXX(paste your actual PDFBolt API key)
Choose Your Endpoint
Select the PDFBolt endpoint based on your app's needs:
| Endpoint | Best For | Returns |
|---|---|---|
/v1/direct | Immediate PDF delivery | Raw PDF data in response |
/v1/sync | URL-based access | JSON with download URL (valid for 24 hours) |
/v1/async | Background processing | Webhook callback with results (paid plans only) |
See API Endpoints for detailed specifications.
Choose Your Source
Select the content source that best fits your use case:
| Source | Best For | When to Use |
|---|---|---|
| Templates | Recurring documents with consistent layouts | Certificates, invoices, receipts – any document you generate repeatedly with different data |
| HTML | Custom documents | When you need full control over a unique layout |
| URL | Existing web pages | Archiving documentation, reports, capturing dashboards, saving public web pages |
Learn more about source parameters in the API Documentation.
Source: Templates
Templates provide the most efficient way to generate consistent, branded PDFs by separating design from data – perfect for Bubble apps that need to generate certificates, invoices, or reports.
How It Works
- Create your template in the Dashboard Template Designer or through the Template API:
- Build custom layouts with HTML, CSS, and Handlebars variables.
- Pick a ready-made template from the template gallery.
- Or generate one with AI from a description or reference file.
-
Publish the template to make it available via API and get your unique
templateId. -
Call API from Bubble workflow with
templateIdand data from your database. -
Receive your PDF – Display, download, or email directly from Bubble.
Example: Student Certification Platform
Real-world scenario: You're building an online learning platform in Bubble. When students complete a course, they can generate and download a personalized certificate PDF.
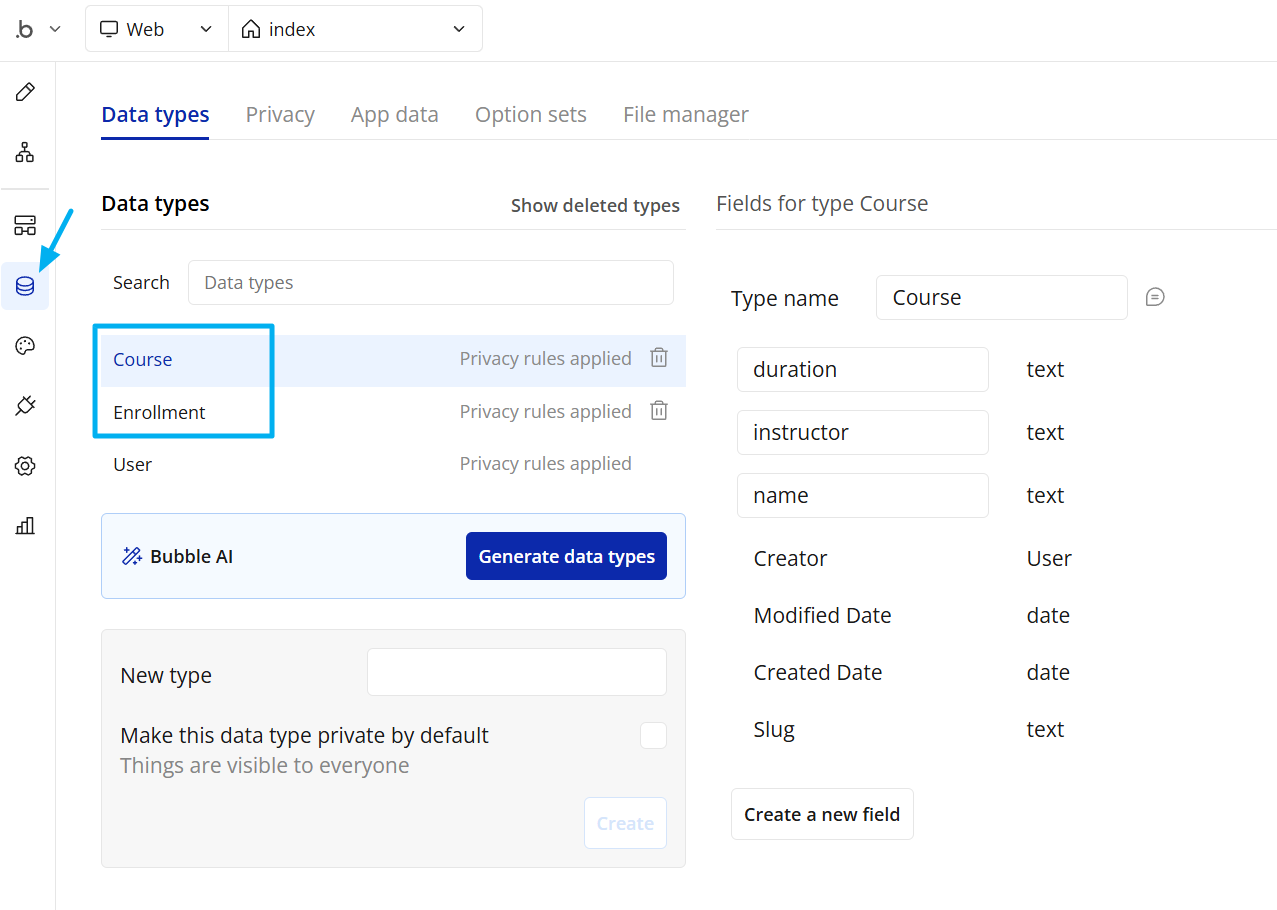
1. Data structure for this example:
Courses (Data Type)
- Name (text)
- Instructor (text)
- Duration (text)
Enrollments (Data Type)
- Student (User)
- Course (Courses)
- Completion Date (date)
2. Create API Call
In API Connector, add a new call under your PDFBolt API:
- Name:
Generate Certificate - Use as:
Action - Data type:
JSON - Request type:
POST - URL:
https://api.pdfbolt.com/v1/sync
Body:
{
  "templateId": "your-certificate-template-id",
  "templateData": {
    "student_name": "<student_name>",
    "course_title": "<course_title>",
    "completion_date": "<completion_date>",
    "instructor_name": "<instructor_name>",
    "course_duration": "<course_duration>"
  }
}

The <parameter_name> syntax in Bubble's API Connector creates dynamic parameters that you'll fill with actual data in your workflows. Bubble automatically detects these and makes them available when you use the API call.
3. Initialize the Call
After configuring the body:
-
Fill in sample values for each parameter to test:
- student_name:
John Doe - course_title:
Advanced Web Development - completion_date:
2025-04-10 - instructor_name:
Prof. Sarah Chen - course_duration:
12 weeks
- student_name:
-
Uncheck "Private" checkbox – this allows dynamic values in workflows.
-
Click Initialize call to test the connection.
-
If successful, Bubble will show the response structure.

4. Build the User Interface
Create a page showing the student's enrolled and completed courses in a Repeating Group with course details and a "Generate Certificate" button.
Create the Workflow
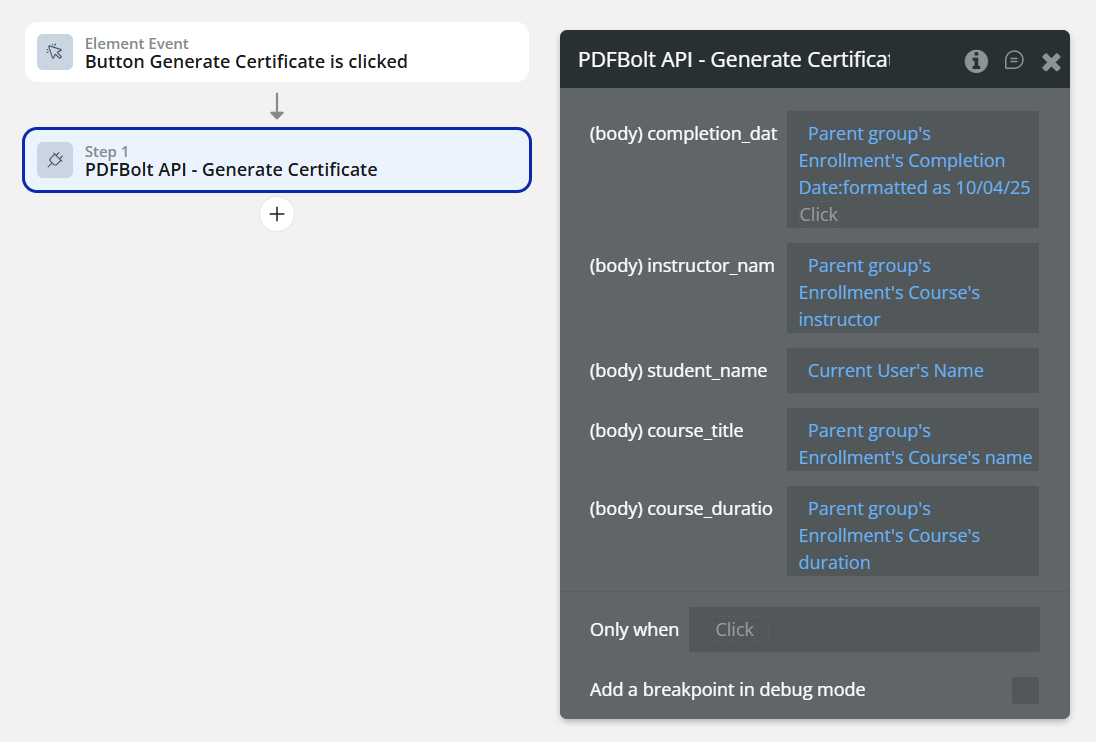
Click on the button "Generate Certificate" → Start/Edit workflow.
Step 1: Generate PDF
- Action: Plugins → PDFBolt – Generate Certificate
- Fill parameters with dynamic data:
student_name:Current User's Namecourse_title:Parent group's Enrollment's Course's namecompletion_date:Parent group's Enrollment's Completion Date:formatted as MMMM D, YYYYinstructor_name:Parent group's Enrollment's Course's instructorcourse_duration:Parent group's Enrollment's Course's duration
Step 2: Navigate to PDF
- Action: Navigation → Open an external website
- Destination:
Result of step 1's documentUrl - Open in:
New tab
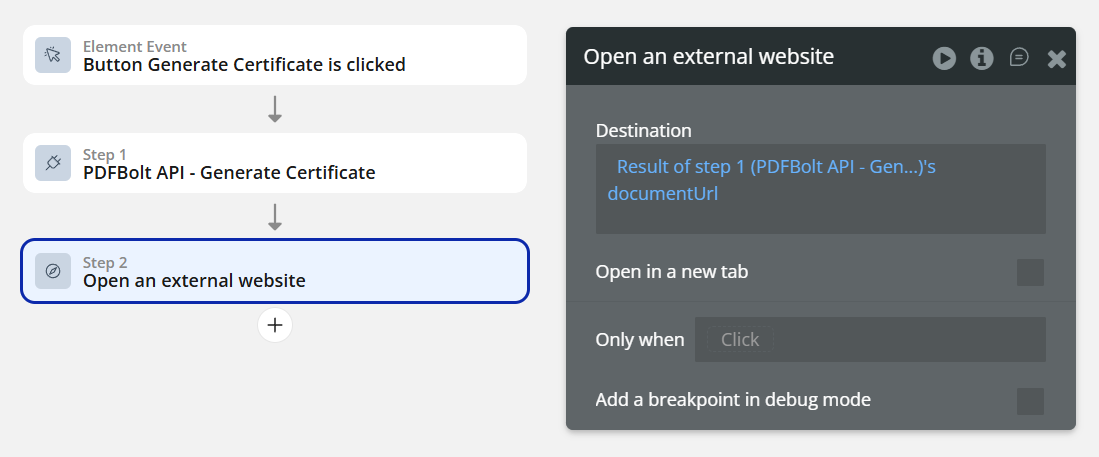
Use Result of step 1 to access API response data in subsequent workflow steps. Bubble makes all returned fields available automatically.
Template Workflow Example

What happens:
- Student completes course (marked in database).
- Student clicks "Generate Certificate" button.
- Workflow triggers → generates personalized PDF.
- PDF opens in new tab for download.
Beyond templates, PDFBolt can generate PDFs from:
- HTML content – Custom document layouts.
- URLs – Convert any public HTTPS webpage to PDF.
Additional Resources
PDFBolt Documentation
- Template Management Guide – Create and manage templates.
- Templates Overview – Template concepts, benefits, and use cases.
- API Endpoints – Complete endpoint reference.
- Conversion Parameters – Full parameter documentation.
- Error Handling – Error codes and solutions.
- S3 Bucket Upload – Store PDFs permanently.