Integrately Integration Guide
Learn how to integrate PDFBolt with Integrately to automate PDF generation in your workflows. Generate professional documents from templates, HTML content, or web pages using Integrately's automation platform.
Prerequisites
Before starting, ensure you have:
- PDFBolt API Key
- Sign up or log in to your PDFBolt account.
- Navigate to the API Credentials section.
- Copy your API key for authentication.
- Integrately Account
- Active Integrately account (free or paid plan).
View PDFBolt on Integrately.
Basic Setup
Create Your First Automation
- Log in to your Integrately account.
- Click + New Automation in the left sidebar.
- Choose your trigger app (the app that will start your automation).
- Search for and select PDFBolt as your action app.
Choose Your Action
PDFBolt provides three actions in Integrately:
| Action | Best For | Returns |
|---|---|---|
| Convert document to PDF in PDFBolt | Immediate PDF delivery (Direct) | Raw PDF file |
| Convert document to download link in PDFBolt | URL-based access (Sync) | JSON with download URL (valid for 24 hours) |
| Run asynchronous conversion in PDFBolt | Background processing (Async) | Request ID for tracking (paid plans only) |
See API Endpoints for detailed specifications of each conversion method.
Choose Your Source
Before configuring your automation, decide which content source you'll use:
| Source | Best For | When to Use |
|---|---|---|
| Templates | Recurring documents with consistent layouts | Invoices, contracts, certificates – any document you generate repeatedly with different data |
| HTML | Custom documents | When you need full control over a unique layout |
| URL | Existing web pages | Archiving documentation, reports, capturing dashboards, saving public web pages |
Learn more about source parameters in the API Documentation.
Source 1: Templates
Templates provide the most efficient way to generate consistent, branded PDFs by separating design from data.
How It Works
- Create your template in the Dashboard Template Designer or through the Template API:
- Build custom layouts with HTML, CSS, and Handlebars variables.
- Pick a ready-made template from the template gallery.
- Or generate one with AI from a description or reference file.
-
Publish the template to make it available via API and get your unique
templateId. -
Use in Integrately with just
templateIdandtemplateData. -
Receive your PDF – PDFBolt merges the data with your template and returns the generated PDF.
Example: Invoice Generation
Real-world scenario: A customer places an order in your e-commerce system. Automatically generate a professional invoice PDF and email it to the customer.
Step 1: Create an automation in Integrately and select your trigger app (e.g., Shopify: Order is paid in Shopify, WooCommerce: Order is completed in WooCommerce, etc.). In this example, we use Google Sheets: Spreadsheet row is created.
Step 2: Add PDFBolt as your action app.
Step 3: Select Convert document to PDF as the action.
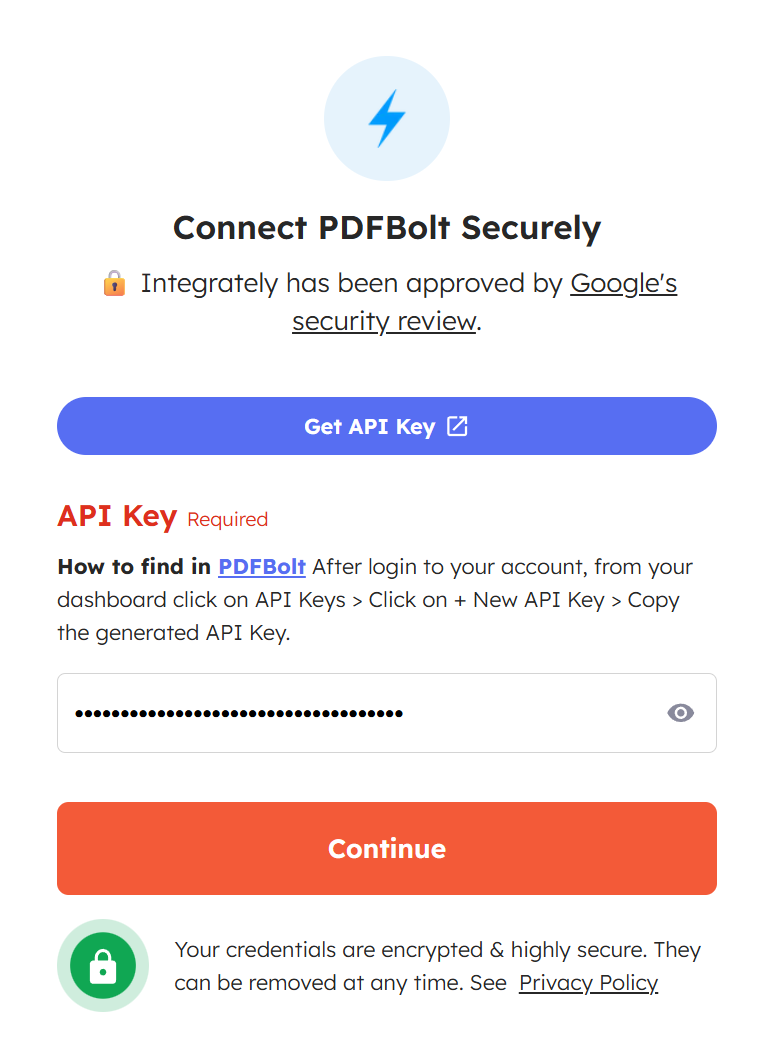
Step 4: Connect PDFBolt securely by pasting your API key.
- Click Get API Key – you'll be redirected to PDFBolt's API Credentials section where you can create a new key or copy an existing one.
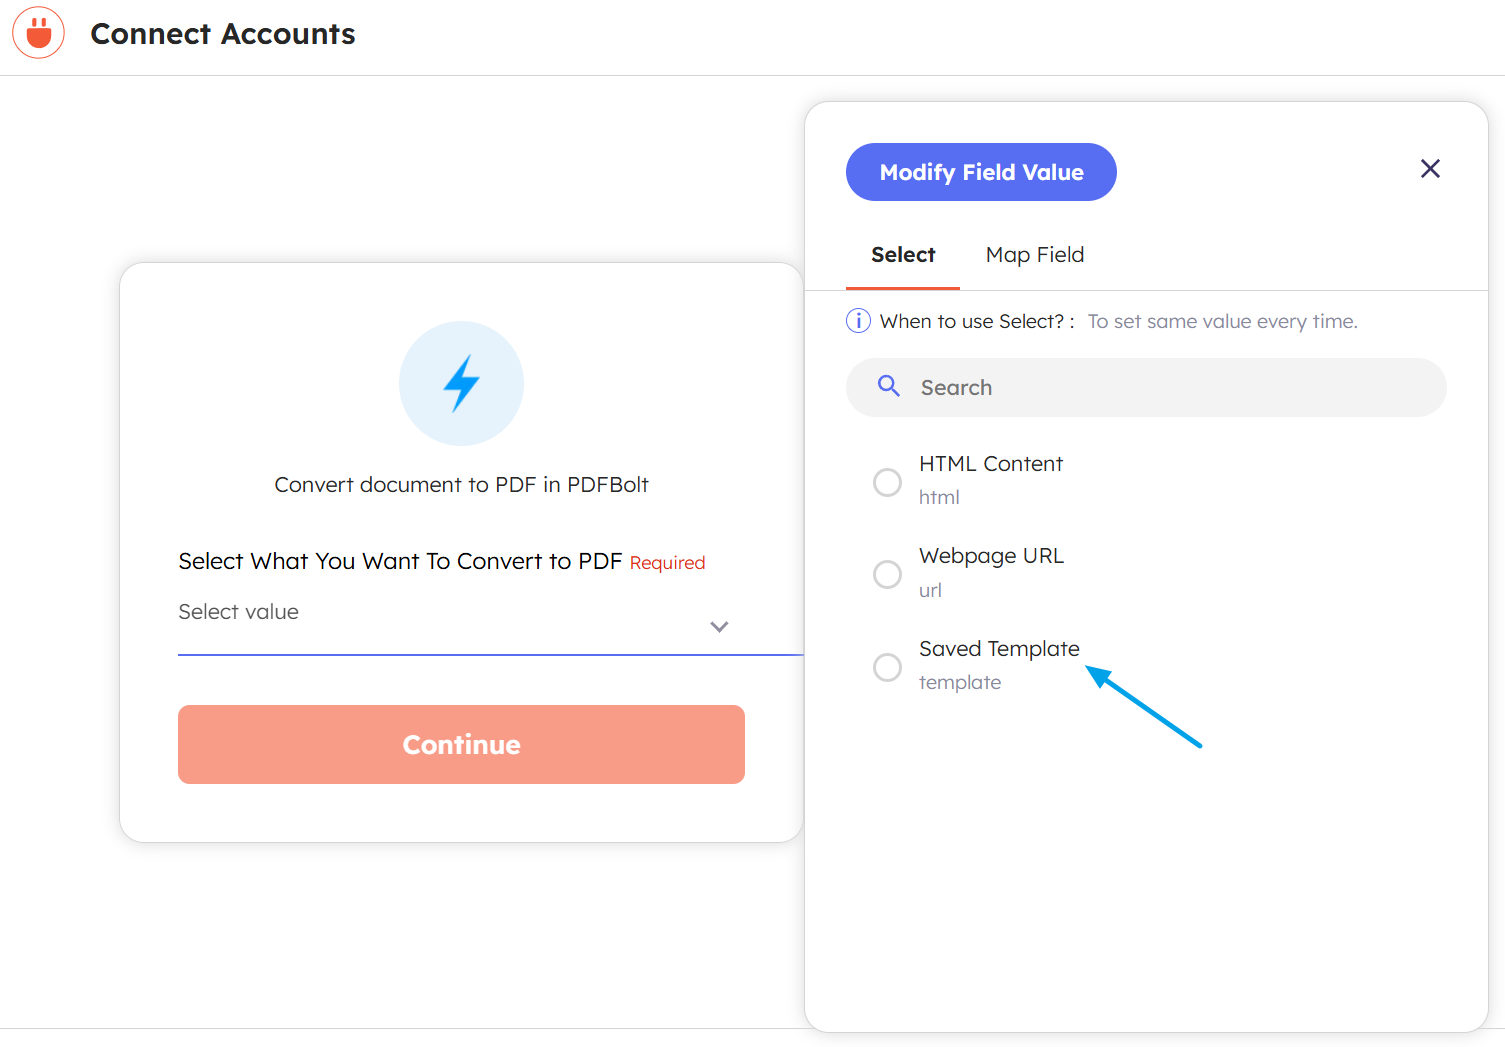
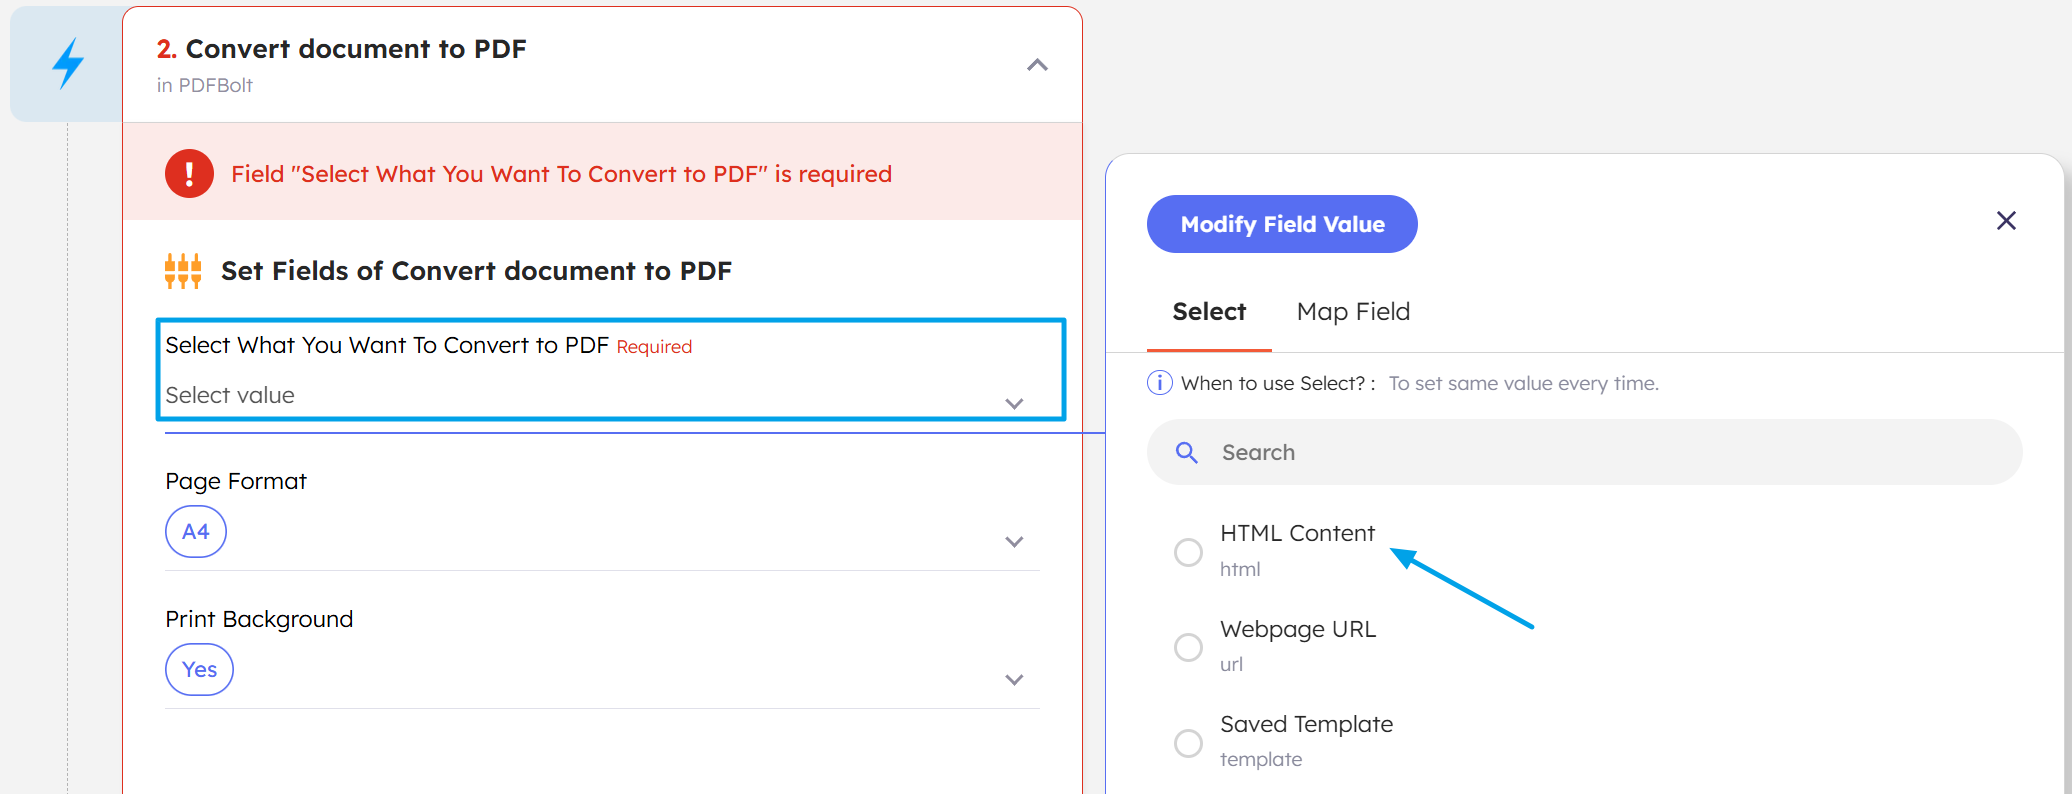
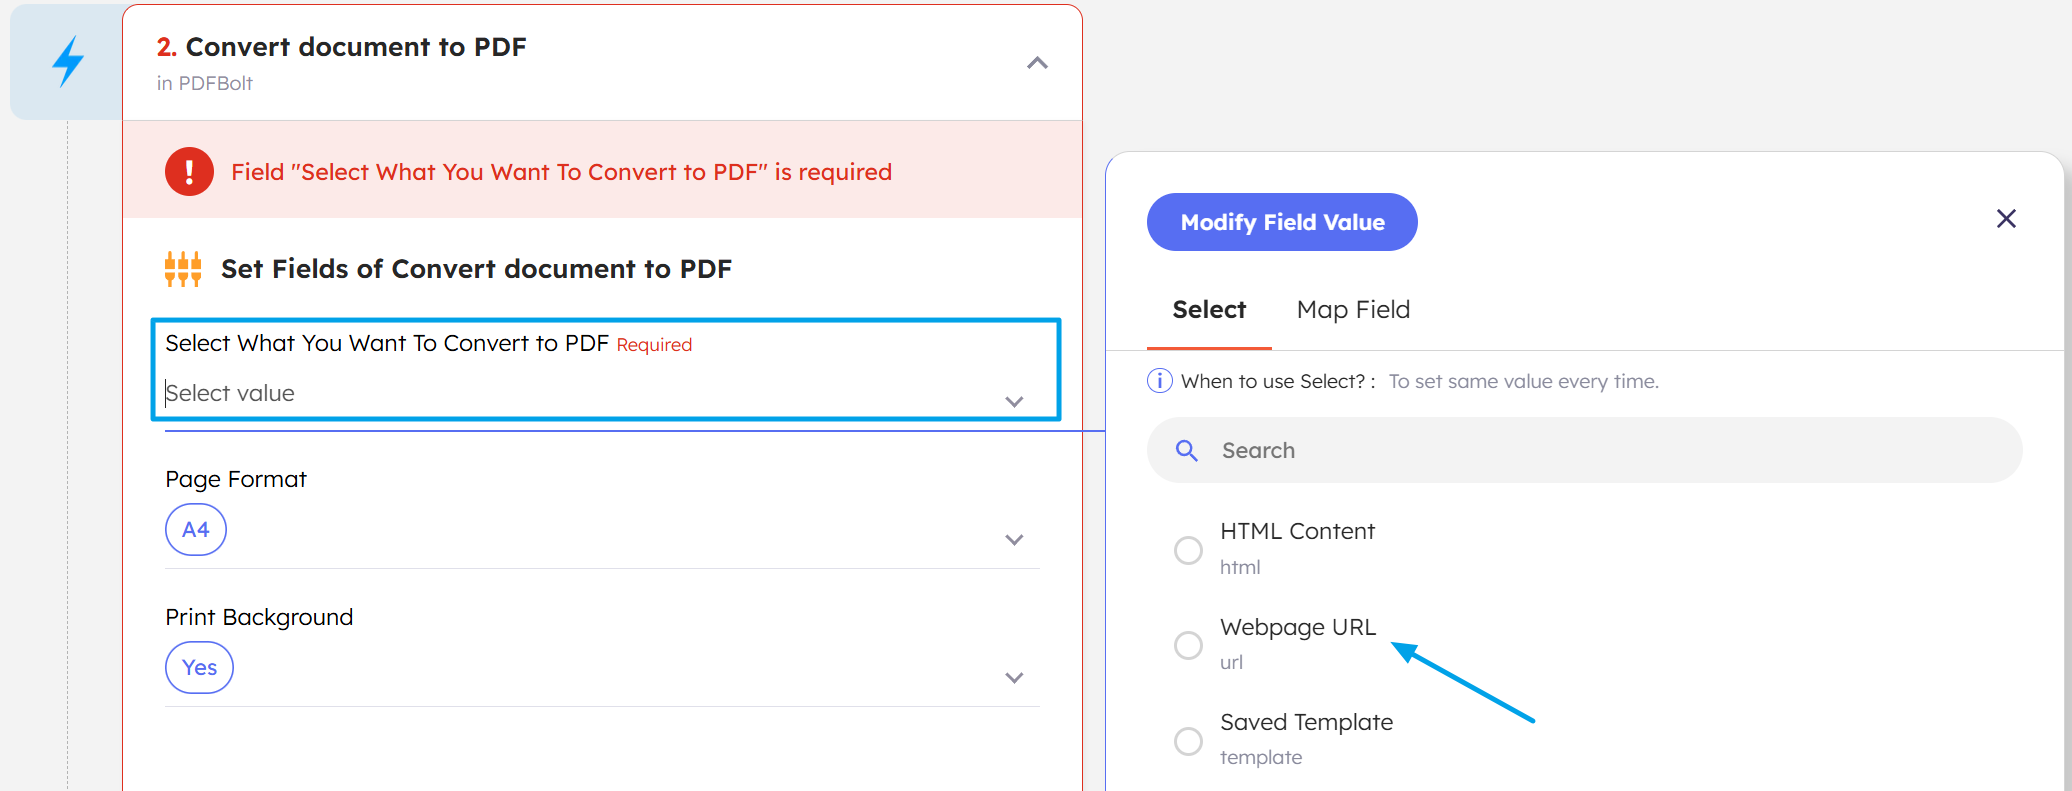
Step 5: Select what you want to convert to PDF.
In this example, choose Saved Template as your source.
Step 6: Configure the PDF conversion settings.
Set your desired options such as Page Format, Margins, and other parameters.
Required fields:
- Template ID: Enter your template ID from PDFBolt.
- Template Data: Map fields from your trigger to template variables.
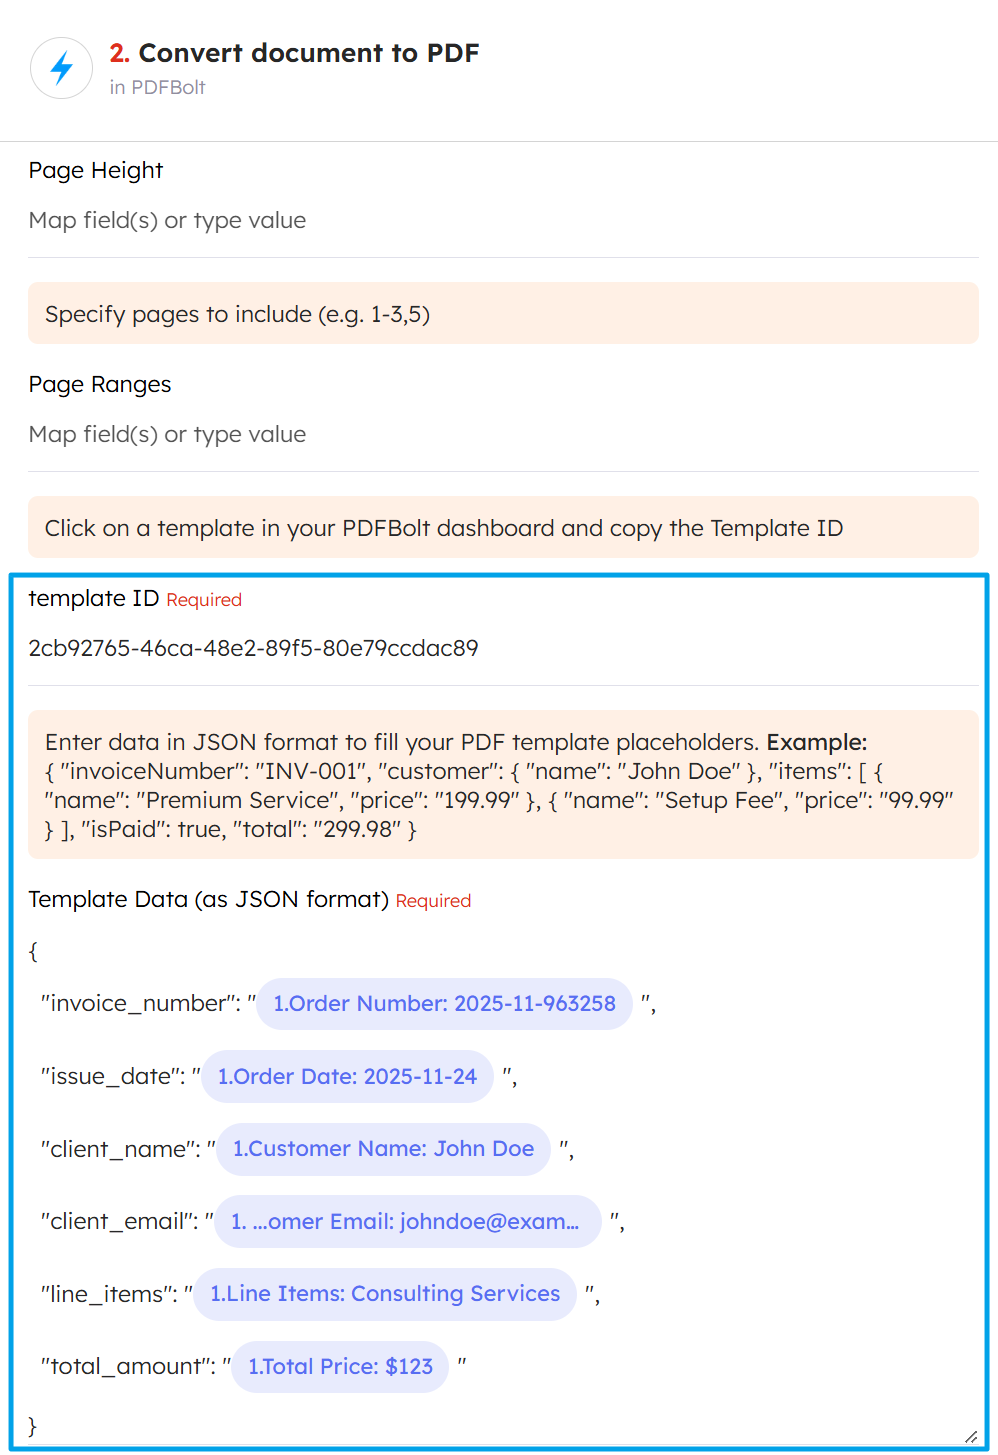
Use Integrately's field mapping interface to connect trigger data to your template variables. Field names must match your template's Handlebars variables exactly.
Step 7: Add another action to send the PDF.
- Choose Gmail or SendGrid to send the invoice via email.
- Or select Google Drive or Dropbox to store it in cloud storage.
Template Automation Example
Complete automation flow:
- Google Sheets: Spreadsheet row is created – New order data added.
- PDFBolt: Convert document to PDF – Generates invoice PDF.
- Gmail: Send email – Sends invoice to customer.
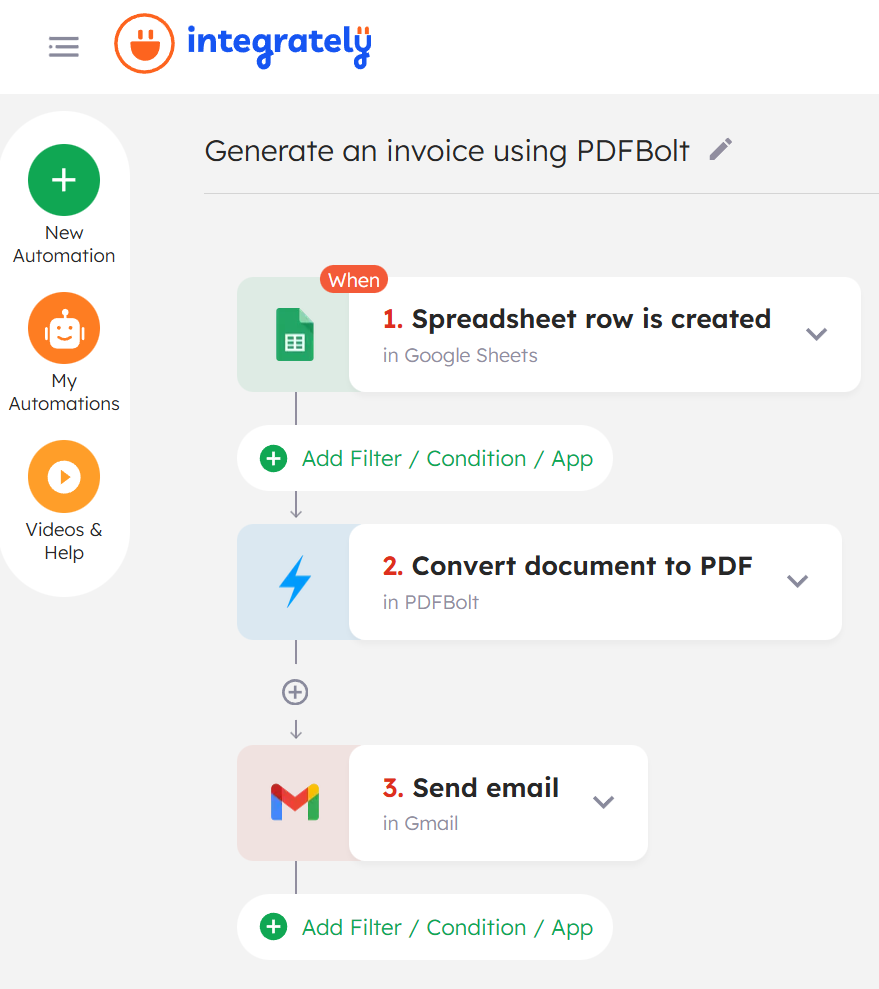
This pattern works with Shopify, WooCommerce, Stripe, Square, BigCommerce, or any e-commerce platform in Integrately. Map order fields to your template variables.
Source 2: HTML
Convert HTML directly into PDFs – useful for custom documents or one-time layouts.
How It Works
- Generate or paste HTML content in your workflow.
- Integrately automatically handles Base64 encoding.
- PDFBolt converts encoded HTML to PDF.
- Receive your PDF.
When you paste HTML into Integrately's PDFBolt action, it automatically handles Base64 encoding – no manual encoding step needed.
Example: Event Program
Real-world scenario: You're organizing a webinar or conference and want attendees to download a PDF program with schedule, speakers, and session details.
Step 1: Set up your trigger (e.g., Typeform: Form is submitted in Typeform or Google Forms: Response is created in Google Forms). In this example, we use Google Forms.
Step 2: Add PDFBolt: Convert document to download link action (or Convert document to PDF).
Configure the action:
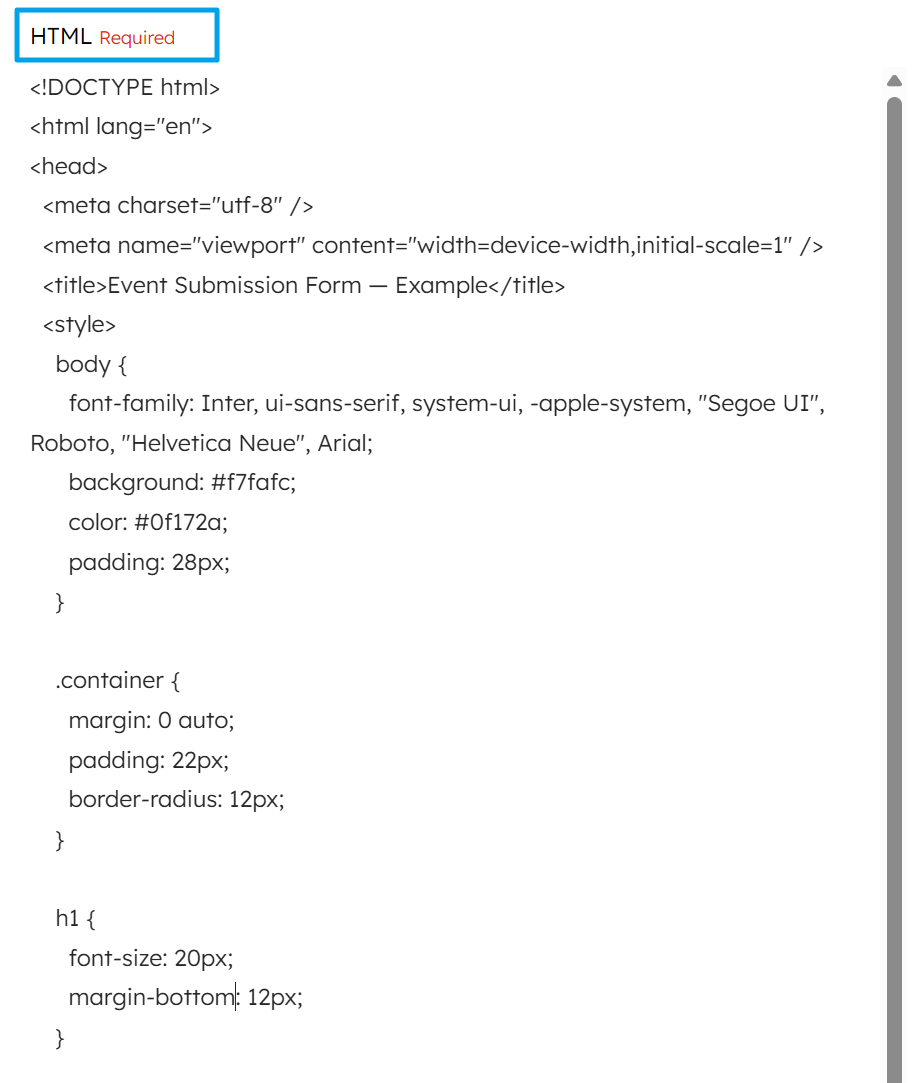
- Source: Select HTML.
- HTML: Paste your HTML content (you can include dynamic values from previous steps).
- Adjust additional parameters, for example:
- Format:
A3 - Print Background:
true
- Format:
Customize PDF formatting by configuring additional parameters in the PDFBolt action. See Conversion Parameters for all available options. In Integrately, you'll also find helpful notes about units, example values, and more.
Step 3: Add an email action to send the program.
- Choose Gmail or SendGrid to send the event program via email.
- Include the PDF download link in the email body or attach the PDF file directly.
HTML Automation Example
Complete automation:
- Response is created in Google Forms – Event registration submitted.
- PDFBolt: Convert document to PDF – Generate program PDF from HTML.
- Gmail: Send Email – Deliver program to attendee.

Source 3: URL
Generate PDFs from any publicly accessible HTTPS webpage – useful for archiving web content, capturing dashboards, or saving documentation.
How It Works
- Provide the target webpage URL.
- PDFBolt loads and renders the page.
- Returns PDF of the rendered page.
Example: Team Report Distribution
Real-world scenario: When a team member posts a request in a Slack channel, automatically capture the current state of the dashboard as PDF and distribute it to the team.
Step 1: Set up Slack: Message is posted on private channel trigger.
Configure the trigger to monitor a specific channel where team members can request reports (e.g., #reports or #analytics).
Step 2: Add PDFBolt: Convert document to download link action.
Configure the action:
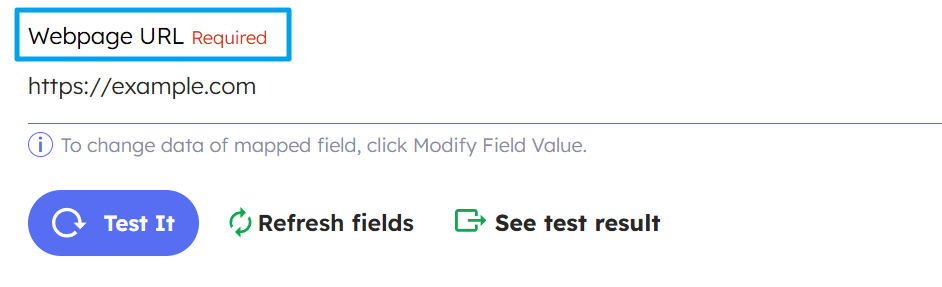
- Source: Select Webpage URL.
- URL: Enter your dashboard or report URL.
Adjust additional parameters, for example:
- Format:
A4 - Print Background:
true - Margins: e.g.,
20px
Step 3: Add Slack: Send channel message action.
Share the generated report PDF with the team directly in Slack, including the download link.
Step 4: Add Google Drive: Upload file action.
Archive the PDF in a designated Google Drive folder (e.g., "Weekly Reports") for historical records and easy access.
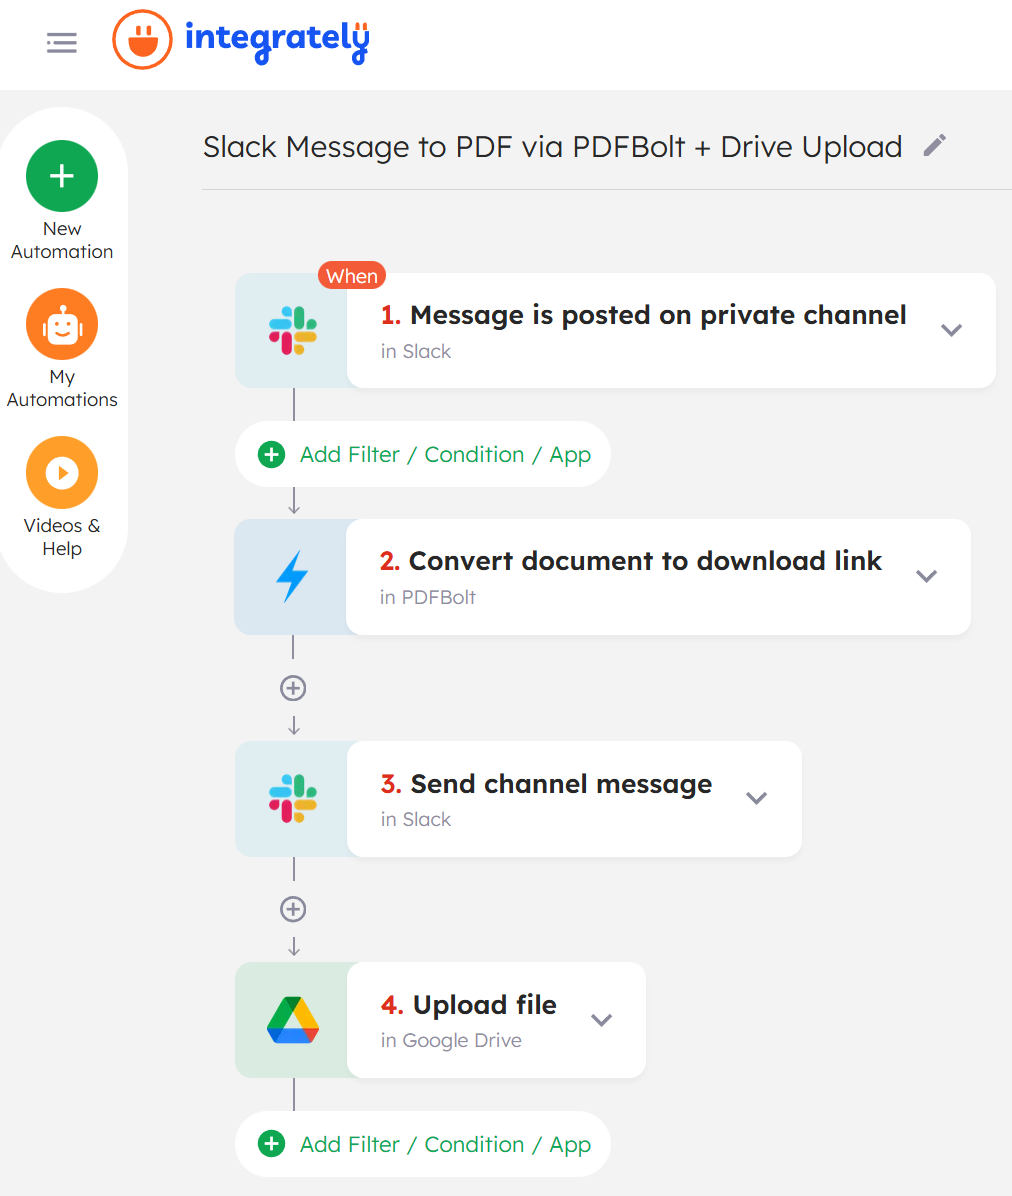
URL Automation Example
Complete automation:
- Slack: Message is posted on private channel – Team member requests report.
- PDFBolt: Convert document to download link – Capture dashboard as PDF.
- Slack: Send channel message – Share PDF with team.
- Google Drive: Upload file – Archive in Reports folder.
Converting PDFs with Async Method
For background document generation or when working with large files, use the Run asynchronous conversion action.
How It Works
- Submit conversion request to PDFBolt.
- Receive immediate
requestIdconfirmation. - PDFBolt processes in background.
- Receive webhook notification when complete.
Async conversion prevents timeouts, handles larger files, and returns immediately with a request ID – well suited for batch processing and background workflows.
Example: Bulk Rental Agreement Generation
Real-world scenario: A property management company needs to generate lease agreements for multiple new tenants moving in at the beginning of the month. Use async conversion to generate agreements without waiting for each to complete.
Step 1: Set up trigger (e.g., Airtable: Record is created in Airtable).
Configure the trigger to monitor your tenant database.
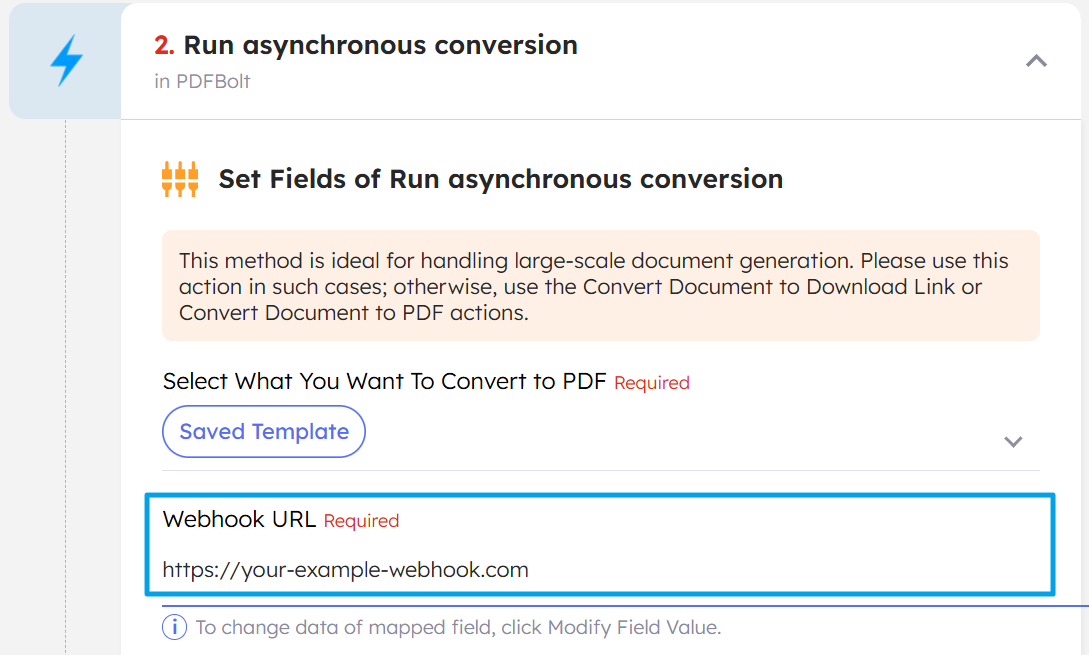
Step 2: Add PDFBolt: Run asynchronous conversion action.
Configure the action:
- Template ID: Your lease agreement template ID.
- Template Data: Map tenant and property information from your trigger (e.g., tenant name, property address, lease duration, monthly rent, deposit amount, move-in date, etc.).
- Webhook URL: Enter your webhook endpoint to receive completion notifications.
Async conversion requires a Webhook URL to receive completion notifications. You must provide a valid webhook endpoint.
Step 3: Store the requestId for tracking (optional).
You can save the returned requestId back to your Airtable for reference and tracking.
Step 4: Add follow-up actions.
For example, update the lease status in your database or send a notification to your property management team.
Async Automation Example
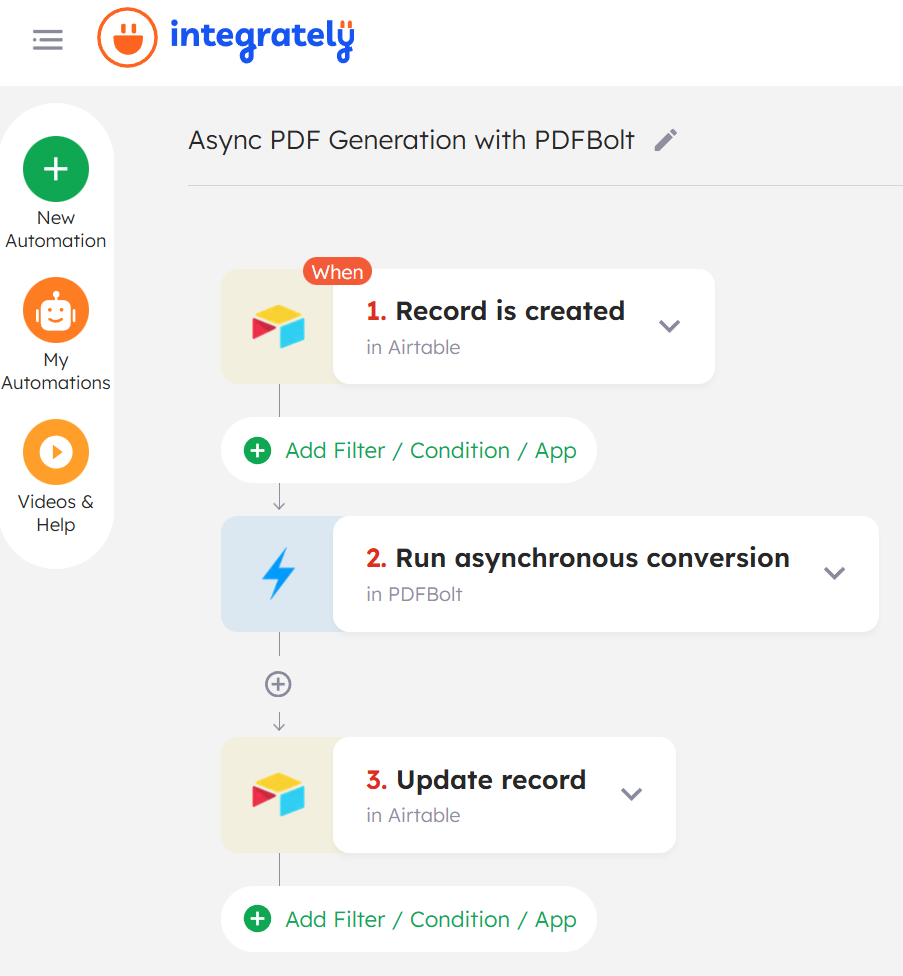
Complete automation:
- Airtable: Record is created in Airtable – New tenant lease information added.
- PDFBolt: Run asynchronous conversion – Generate lease agreement PDF.
- Airtable: Update record in Airtable – Store request ID for tracking or update status.
Additional Resources
PDFBolt Documentation
- Template Management Guide – Create and manage templates.
- Templates Overview – Template concepts, benefits, and use cases.
- API Endpoints – Complete endpoint reference.
- Conversion Parameters – Full parameter documentation.
- Error Handling – Error codes and solutions.