n8n Invoice Automation: Generate and Send PDF Invoices

Payment processors generate their own invoices, but those come with generic layouts and zero branding. If you need an invoice PDF generator that matches your product's look, you have to build it yourself. With n8n and PDFBolt, you can set up a workflow that listens for payments, generates a branded PDF invoice from a template, emails it to the customer, and archives it in Google Drive. No custom code to deploy, no PDF rendering infrastructure to manage.
This guide walks through building that workflow from scratch using the PDFBolt community node. We cover two e-commerce triggers (Stripe and Shopify), data mapping with the Code node, email delivery, and cloud storage. Everything runs inside n8n's visual workflow builder.
If you've already set up the PDFBolt community node, skip straight to Stripe workflow or Shopify workflow. For the HTTP Request node approach, see the PDF automation guide.
What You Need for n8n Invoice Automation
-
PDFBolt account and API key – sign up if you haven't already. You get 100 free PDFs per month on the free plan, enough to test everything in this guide.
-
An invoice template – either pick one from the template gallery (several invoice layouts are ready to go) or build your own in the template designer. Publish the template and copy the
templateId. You'll need it in every workflow below. -
n8n instance – cloud or self-hosted. The PDFBolt community node is a verified community node, so on n8n Cloud you can search for "PDFBolt" in the nodes panel and add it directly. On self-hosted instances, install it via Settings > Community Nodes >
n8n-nodes-pdfbolt. -
Payment platform credentials – Stripe API key, Shopify store credentials, or WooCommerce API keys, depending on which trigger you plan to use.
How the Invoice Automation Workflow Works
Every invoice automation workflow in this guide follows the same four-step pattern:
- Trigger – A payment event fires (Stripe payment succeeds, Shopify order is created, WooCommerce order completes).
- Transform – A Code node maps the payment data to the fields your invoice template expects.
- Generate – The PDFBolt node takes the mapped data, merges it with your template, and returns a PDF.
- Deliver – Gmail sends the invoice to the customer, and Google Drive archives a copy.
The trigger changes depending on your payment platform. The rest stays the same.
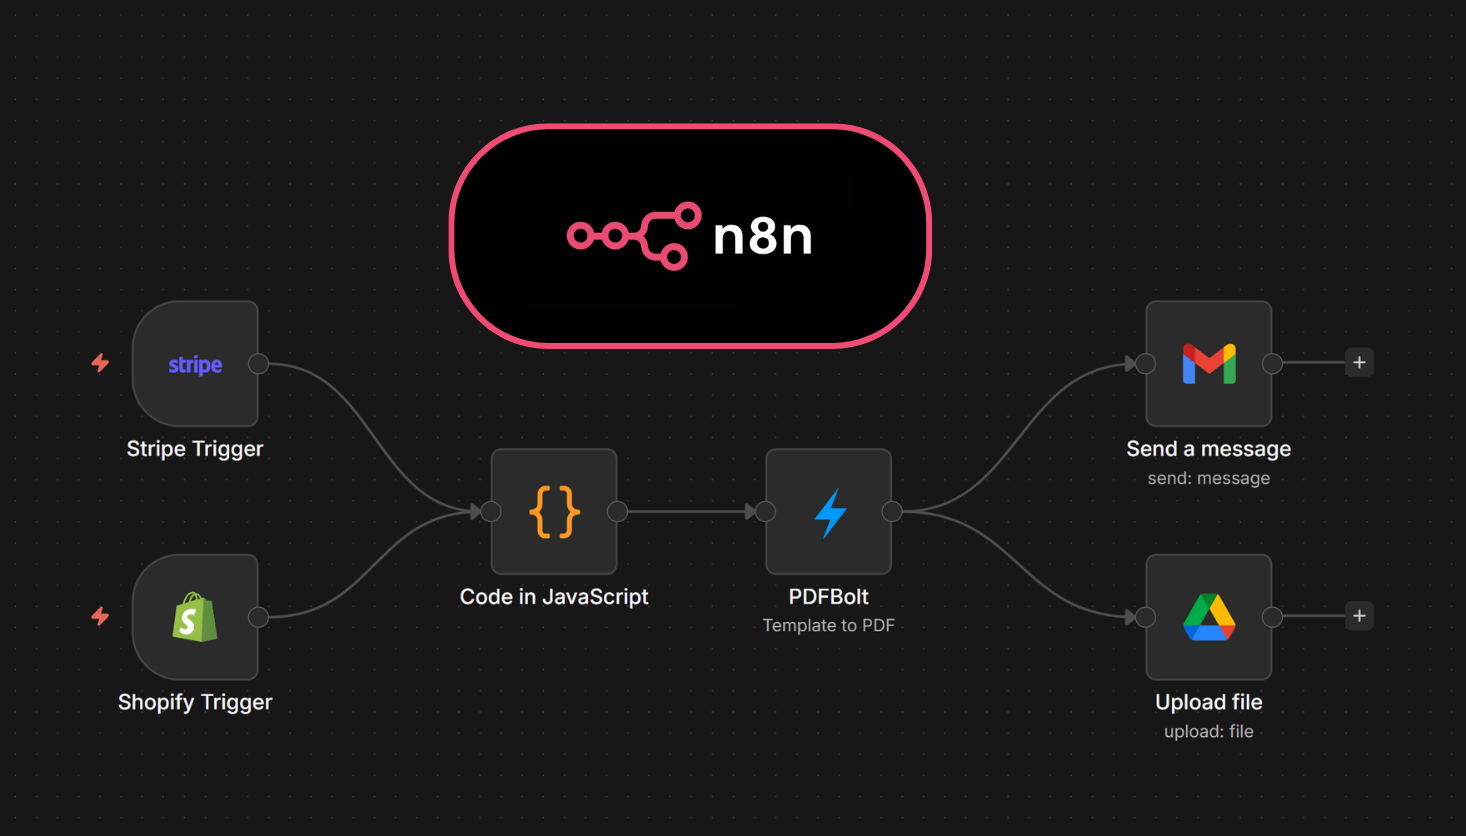
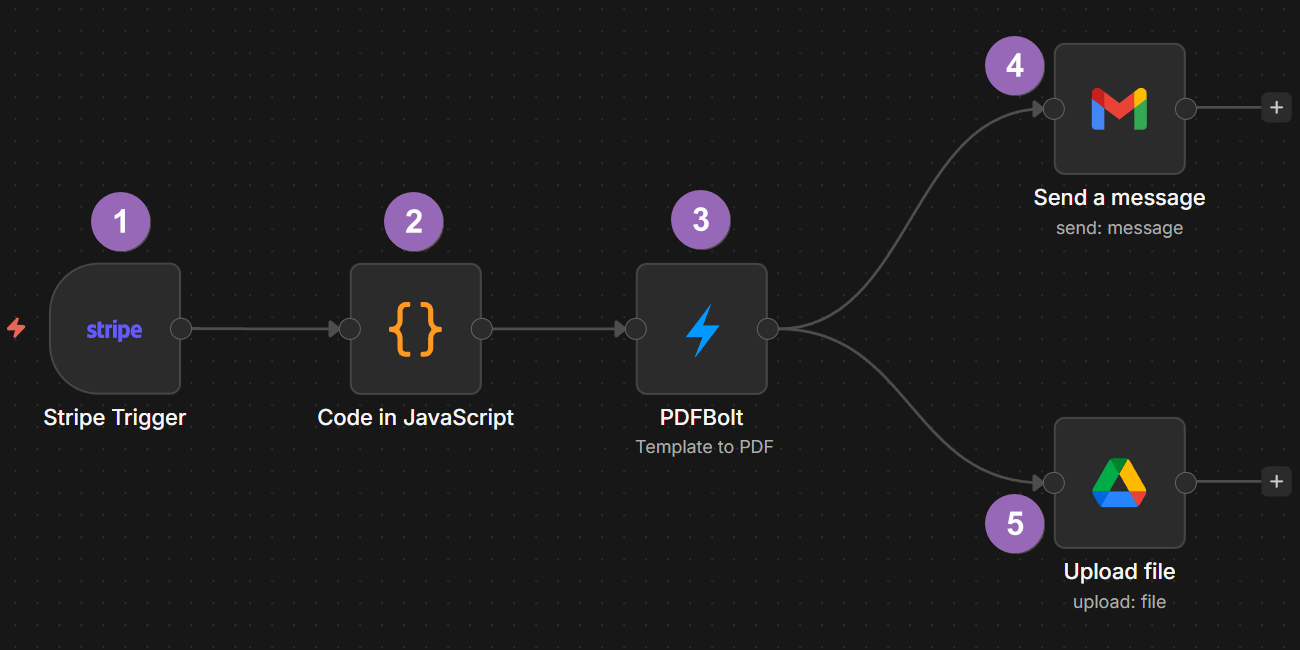
Workflow 1: Stripe Payment to PDF Invoice
Stripe fires an event every time a customer pays an invoice. The payload contains the customer name, email, address, line items, amounts, and currency. Here's what the finished workflow looks like:
Step 1: Stripe Trigger
Add a Stripe node and configure it:
- Trigger: Select
On invoice payment succeeded.
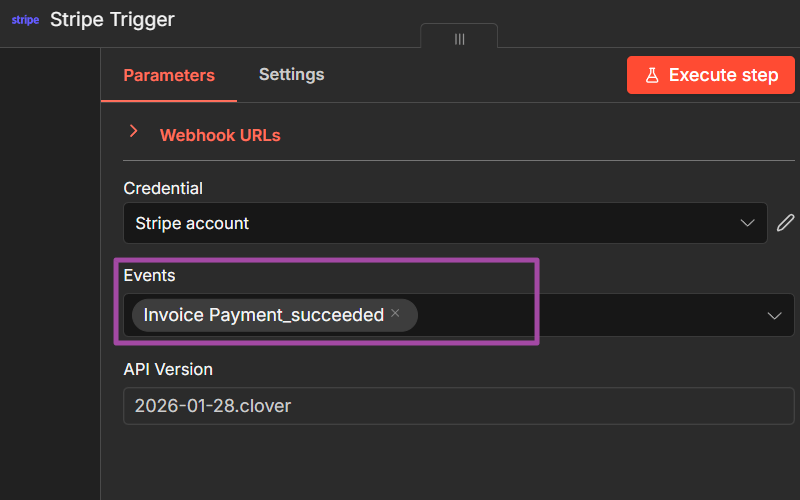
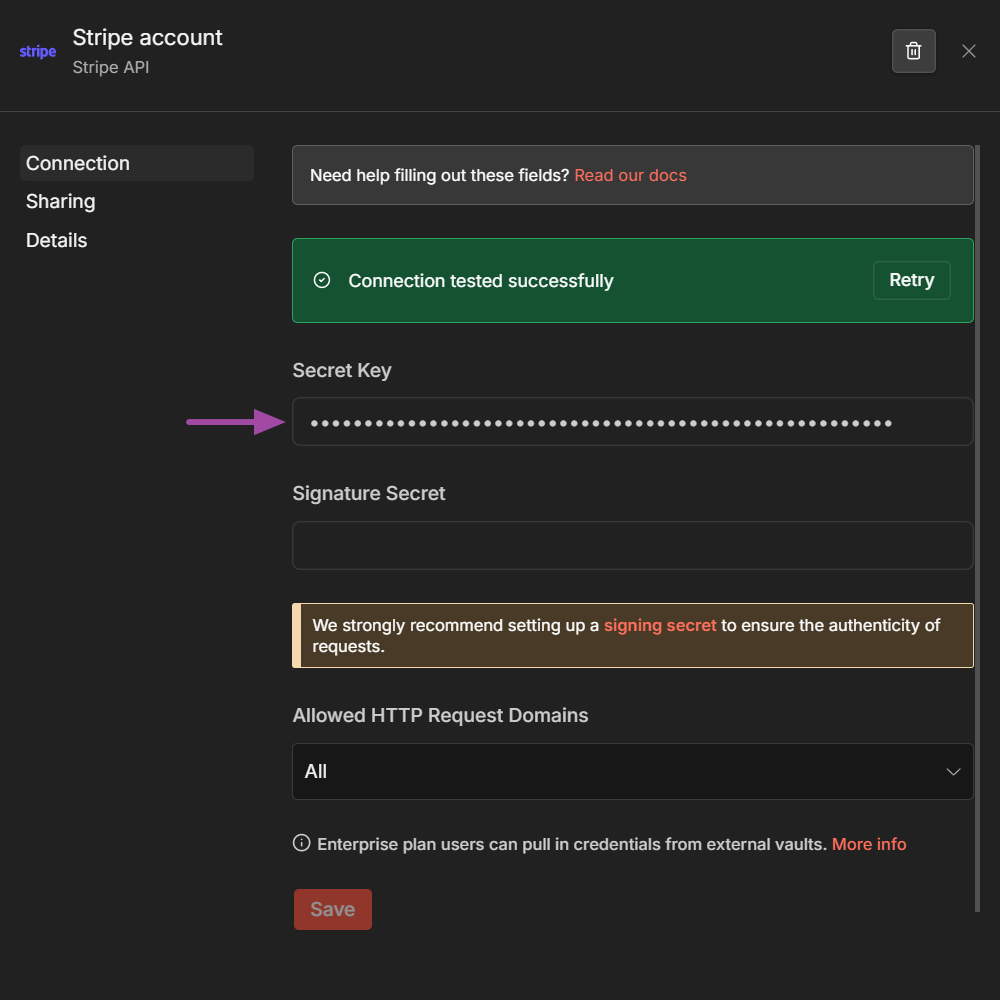
- Credential: Create a new Stripe API credential with your secret key.
When a payment completes, this node outputs the full Stripe invoice object including customer_name, customer_email, customer_address, lines.data[] (line items), subtotal, total, and currency. Stripe returns amounts in cents (e.g., 1500 for $15.00) and dates as Unix timestamps, so the Code node in the next step handles the conversion.
The Stripe Trigger node registers a webhook with Stripe, which means n8n must be reachable from the internet. If you're running n8n locally, use a tunneling tool like ngrok to get a public URL, then set it as your n8n webhook URL. On n8n Cloud this works out of the box.
Step 2: Map Stripe Data to Template Fields
Add a Code node after the Stripe Trigger. Stripe's invoice object uses cents for amounts, Unix timestamps for dates, and a flat structure that doesn't match your template's field names. The Code node handles all of that.
Here's the mapping for a standard invoice template:
const inv = $input.first().json.data.object;

// Map Stripe line items to template format
const lineItems = inv.lines.data.map(line => ({
  description: line.description || line.plan?.nickname || 'Item',
  quantity: String(line.quantity || 1),
  unit_price: ((line.amount / (line.quantity || 1)) / 100).toFixed(2),
  tax_rate: line.tax_rates?.[0]?.percentage
    ? String(line.tax_rates[0].percentage)
    : null,
  total_amount: (line.amount / 100).toFixed(2)
}));

// Currency symbol lookup
const symbols = { usd: '$', eur: '€', gbp: '£', pln: 'zł' };
const symbol = symbols[inv.currency] || inv.currency.toUpperCase();

const subtotal = inv.subtotal / 100;
const tax = (inv.tax || 0) / 100;
const total = inv.total / 100;

return [{
  json: {
    templateData: {
      invoice_number: inv.number || `INV-${Date.now()}`,
      issue_date: new Date(inv.created * 1000).toLocaleDateString('en-US', {
        year: 'numeric', month: 'long', day: 'numeric'
      }),
      due_date: inv.due_date
        ? new Date(inv.due_date * 1000).toLocaleDateString('en-US', {
            year: 'numeric', month: 'long', day: 'numeric'
          })
        : null,
      client_name: inv.customer_name || 'Customer',
      client_email: inv.customer_email,
      client_phone: inv.customer_phone,
      client_address_street: inv.customer_address?.line1,
      client_address_line2: inv.customer_address?.line2,
      client_city: inv.customer_address?.city,
      client_state: inv.customer_address?.state,
      client_postal_code: inv.customer_address?.postal_code,
      client_country: inv.customer_address?.country,
      client_tax_id: inv.customer_tax_ids?.[0]?.value,
      currency_symbol: symbol,
      line_items: lineItems,
      subtotal_amount: subtotal.toFixed(2),
      tax_percentage: inv.lines.data[0]?.tax_rates?.[0]?.percentage
        ? String(inv.lines.data[0].tax_rates[0].percentage)
        : null,
      tax_amount: tax > 0 ? tax.toFixed(2) : null,
      total_amount: total.toFixed(2)
    }
  }
}];

The field names in the Code node must match the Handlebars variables in your PDFBolt template exactly. If your template uses {{customerName}} instead of {{client_name}}, change the keys to match. Mismatched names produce blank fields in the PDF. If your template includes your company details (name, address, logo, payment info), add them as hardcoded values in the same templateData object – these don't come from Stripe.
Step 3: Generate the PDF
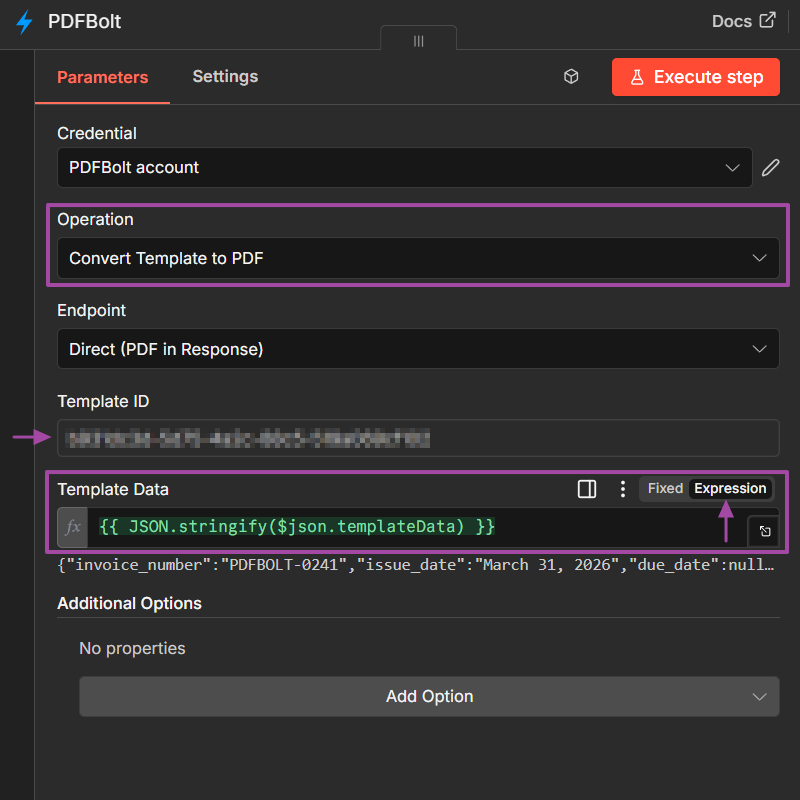
Add a PDFBolt node after the Code node:

- Credential: Create a PDFBolt API credential with your API key.
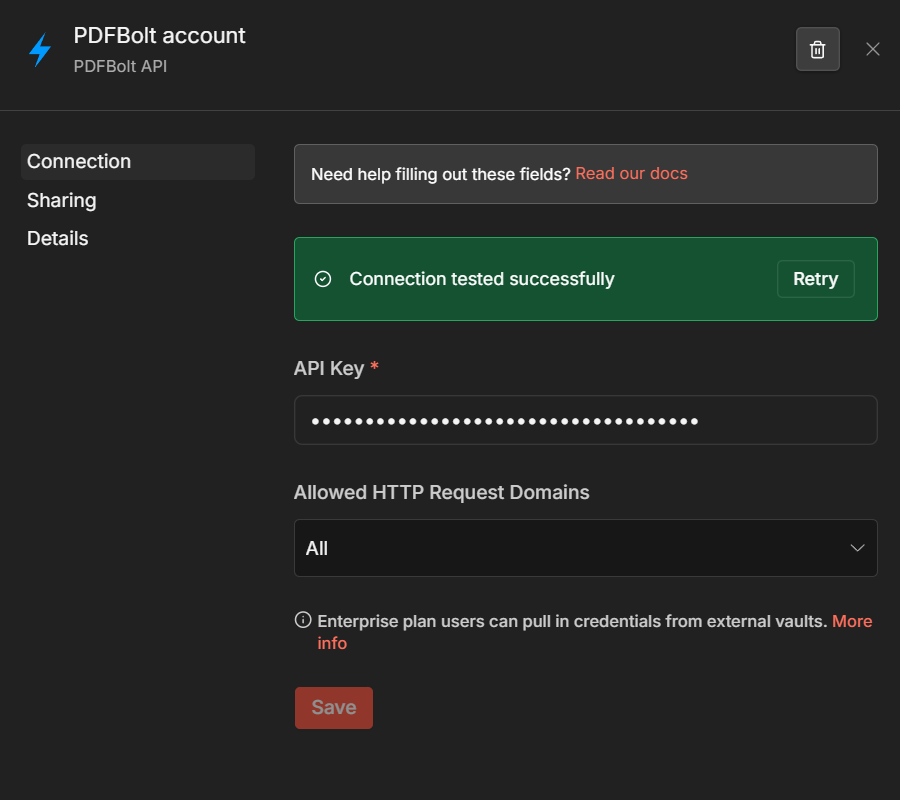
- Operation:
Convert Template to PDF - Endpoint:
Direct - Template ID: Paste your published template ID.
- Template Data: Switch to Expression mode and enter:
{{ JSON.stringify($json.templateData) }}
The node sends the template data to PDFBolt, which merges it with your template and returns the PDF as binary data. The next nodes can attach it to an email or upload it to cloud storage.
Click Add Option in the PDFBolt node to set:
- filename (e.g.,
invoice-{{ $json.templateData.invoice_number }}.pdf) - format (e.g.,
A4orLetter) - compression level (e.g.,
losslessorlow)
See conversion parameters for the full list.
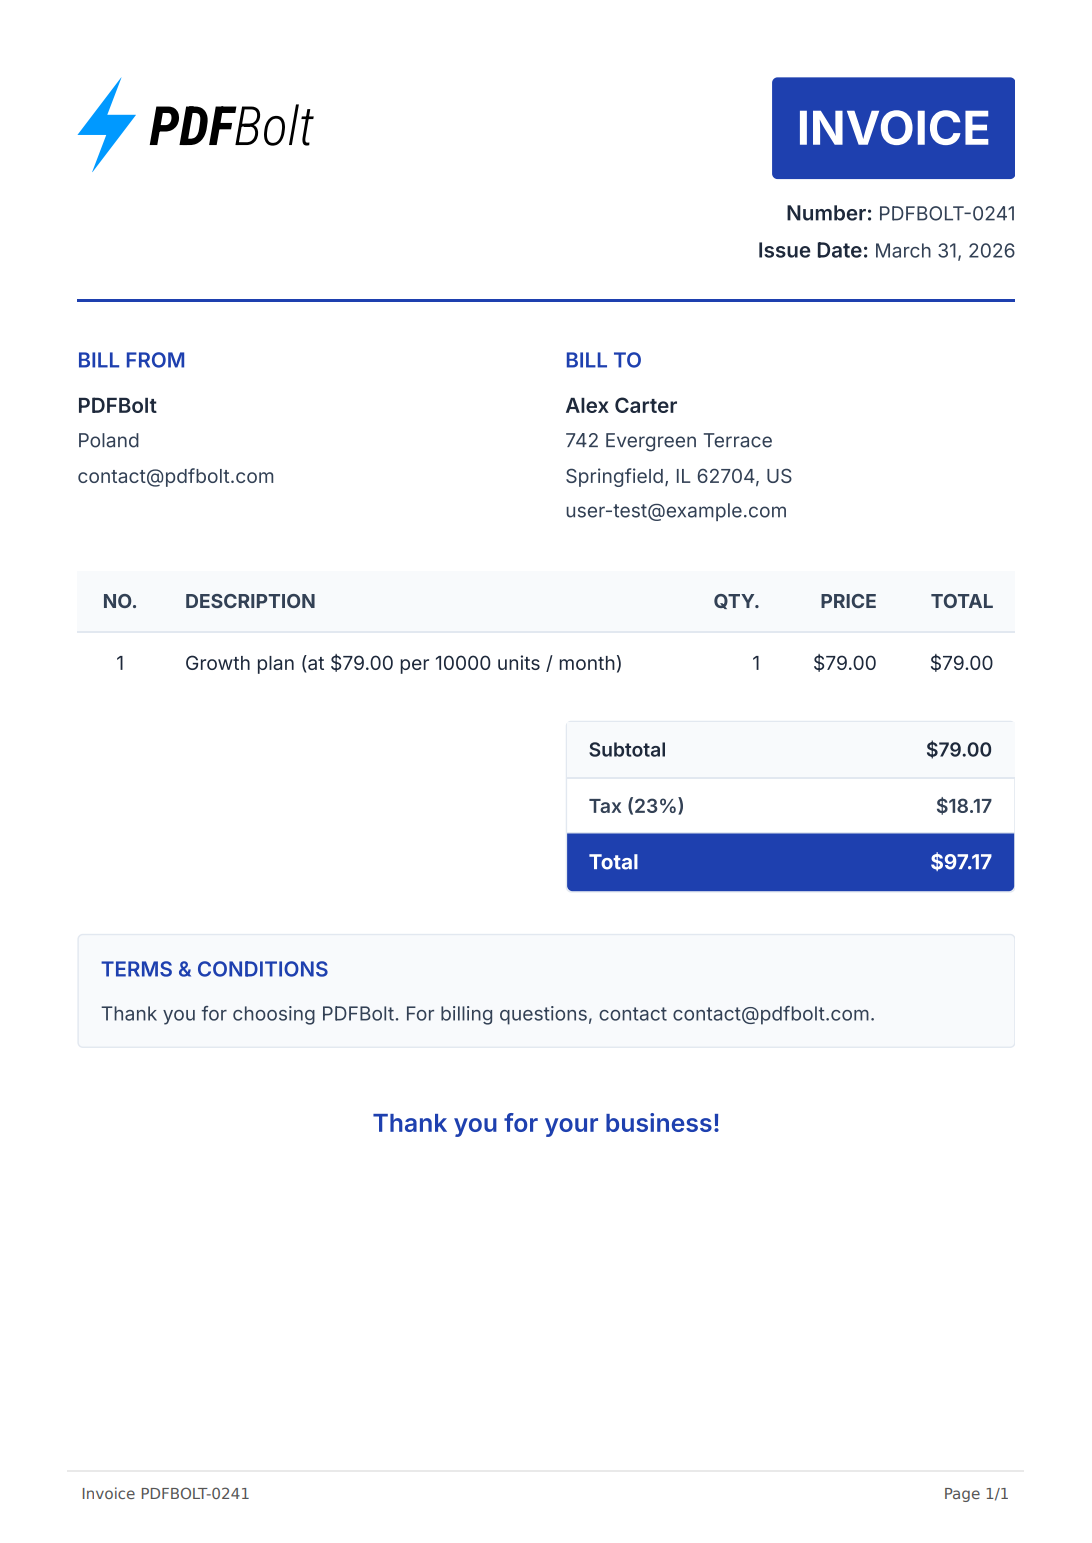
Here's an example of the generated invoice PDF:
Step 4: Email the Invoice
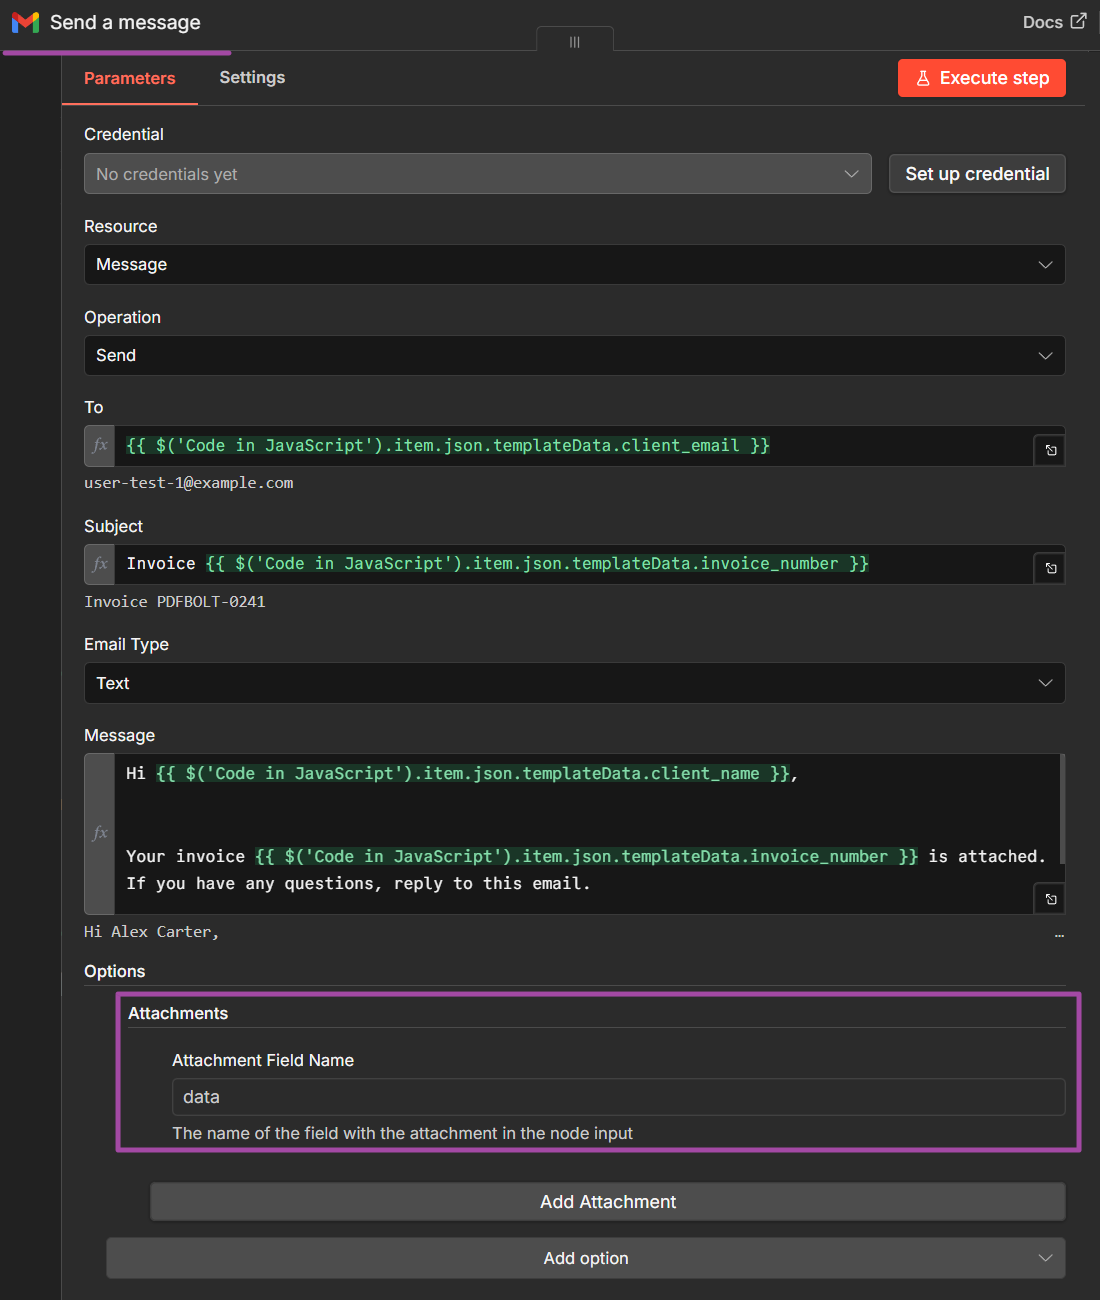
Add a Gmail node (action: Send a Message) after PDFBolt:
- To:
{{ $('Code in JavaScript').item.json.templateData.client_email }} - Subject:
Invoice {{ $('Code in JavaScript').item.json.templateData.invoice_number }} - Message: Write your email body. Keep it short. The invoice is the attachment.
- Attachments: Click Add Option > Attachments > Add Attachment. Set Attachment Field Name to
data– this is the default binary field where the PDFBolt node stores the generated PDF.
The expressions above use $('Code in JavaScript') – n8n's default name for a JavaScript Code node. If you renamed the node, replace it with the exact name shown on your canvas.
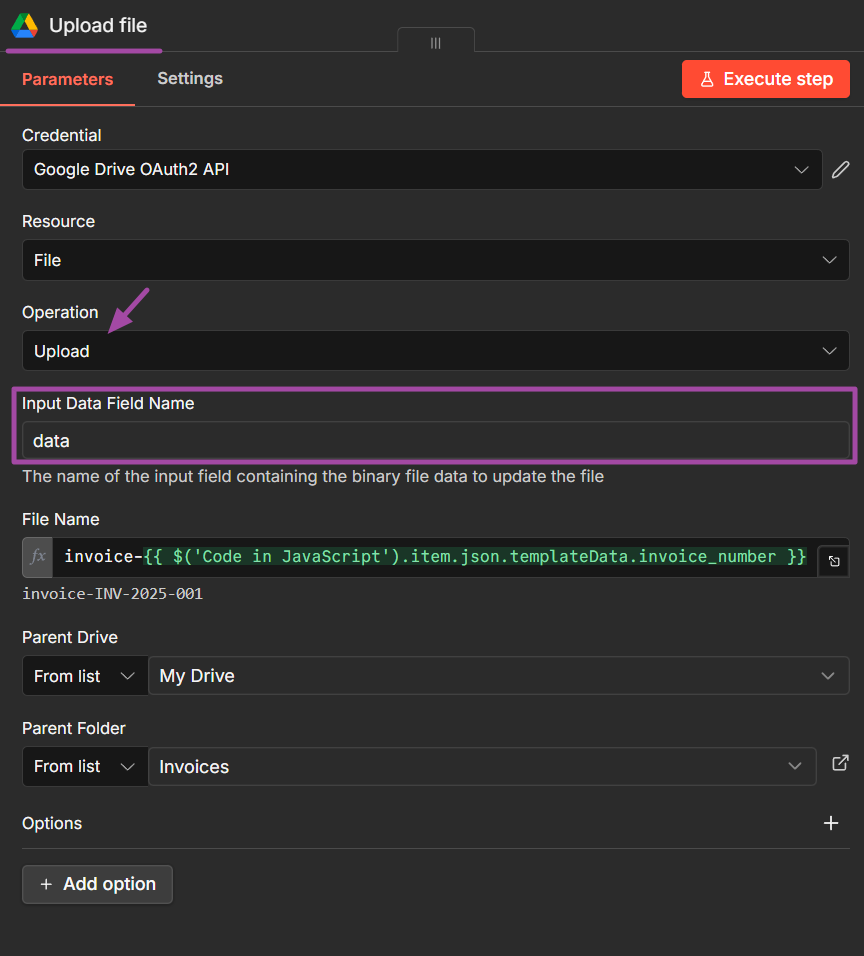
Step 5: Archive to Google Drive (Optional)
Add a Google Drive node (action: Upload file) in parallel with or after Gmail:
- Resource:
File - Operation:
Upload - Input Data Field Name:
data - File Name:
invoice-{{ $('Code in JavaScript').item.json.templateData.invoice_number }} - Parent Folder: Select your invoices folder (e.g.,
Invoices).
Activate the workflow, and every Stripe payment triggers an invoice PDF that lands in the customer's inbox and your Drive archive within seconds.
Workflow 2: Shopify Order to PDF Invoice
Shopify's built-in order printing is too basic for professional branded invoices – most stores end up needing a separate Shopify invoice generator. The Shopify Trigger node in n8n lets you listen for order events and generate invoice PDFs automatically. Here's what the finished workflow looks like:
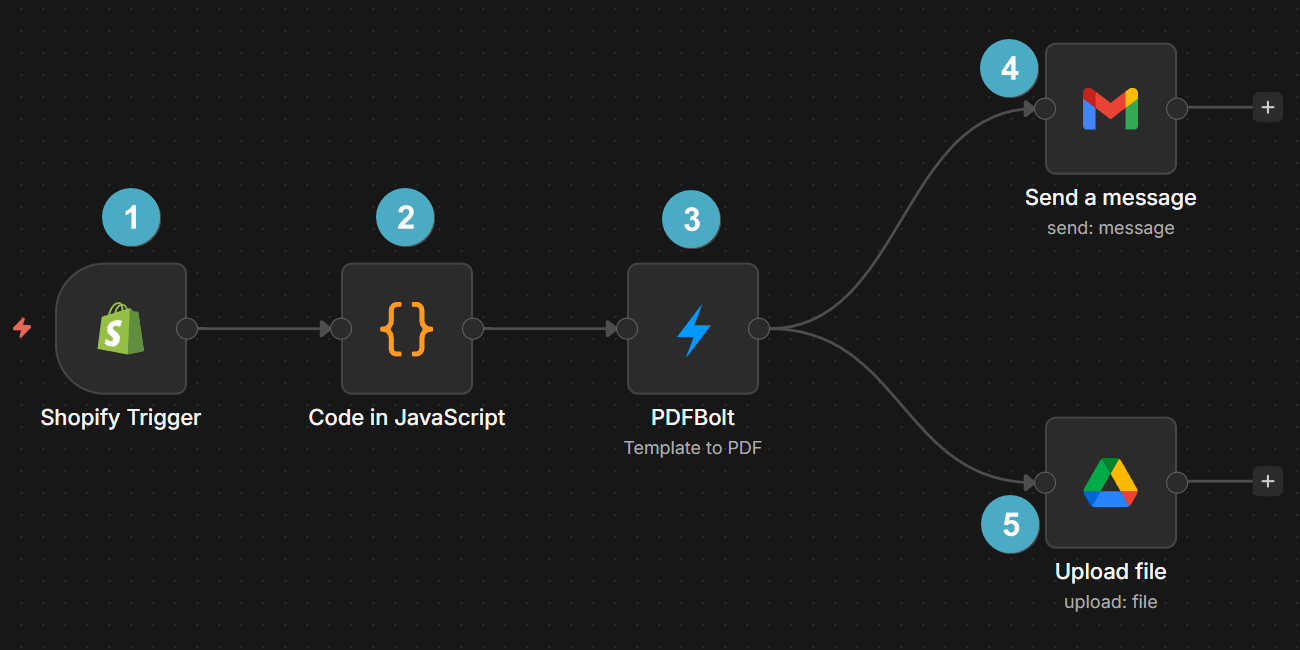
Step 1: Shopify Trigger
Add a Shopify node and configure it:
- Trigger: Select
On order createdorOn order paiddepending on when you want the invoice generated.
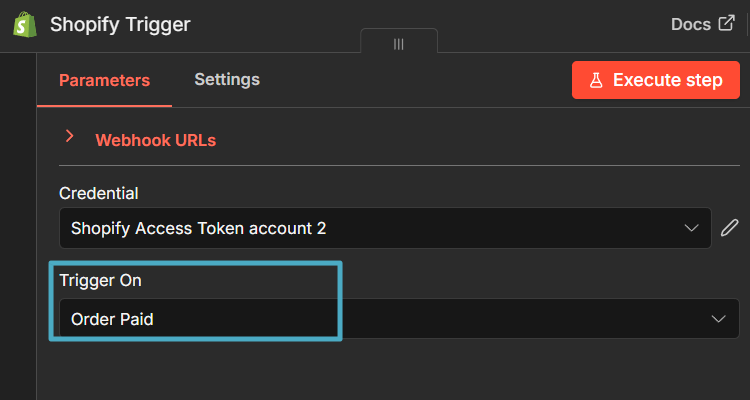
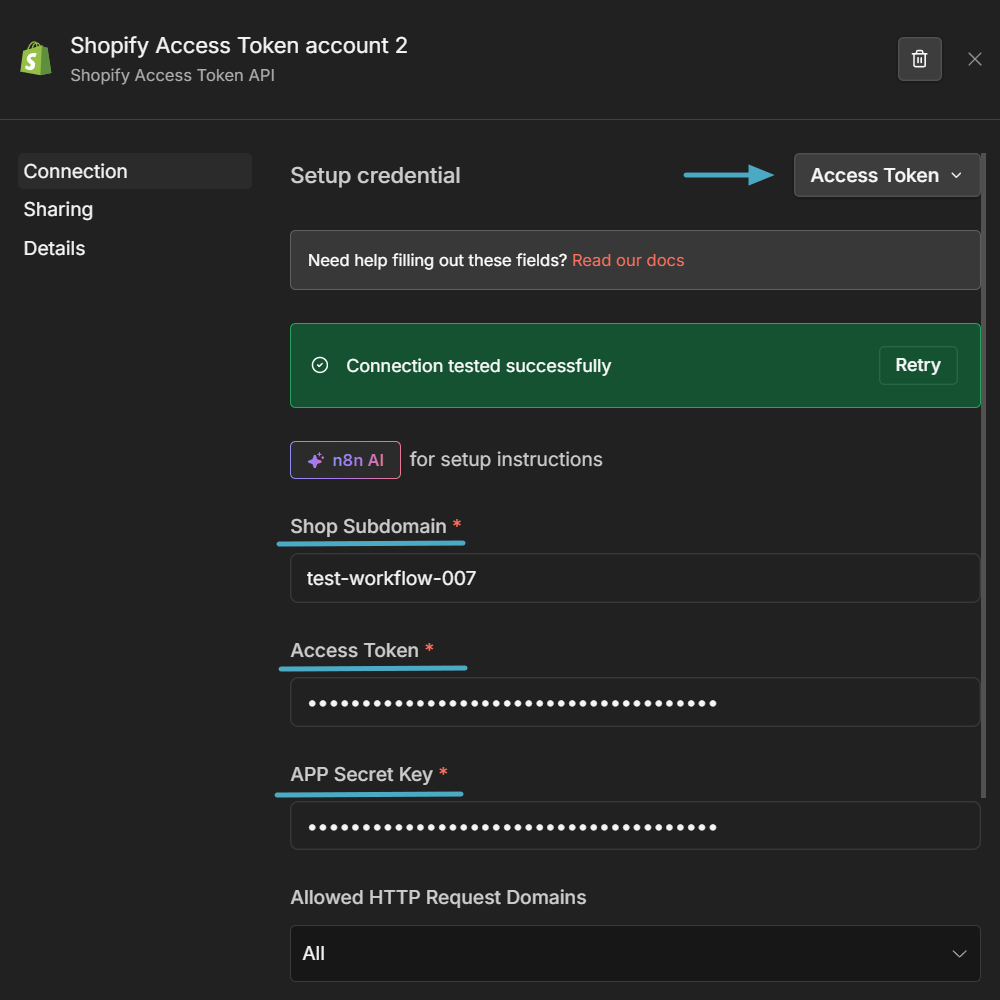
- Credential: Create a Shopify API credential with your shop subdomain, access token, and app secret key. You'll find these in your Shopify admin under Settings > Apps.
When an order comes in, this node outputs the full Shopify order object including customer, line_items, total_price, subtotal_price, total_tax, and order_number. Unlike Stripe, Shopify returns amounts as strings in dollars (e.g., "79.00" not 7900) and tax rates as decimals (e.g., 0.23 for 23%), so the Code node conversion is slightly different.
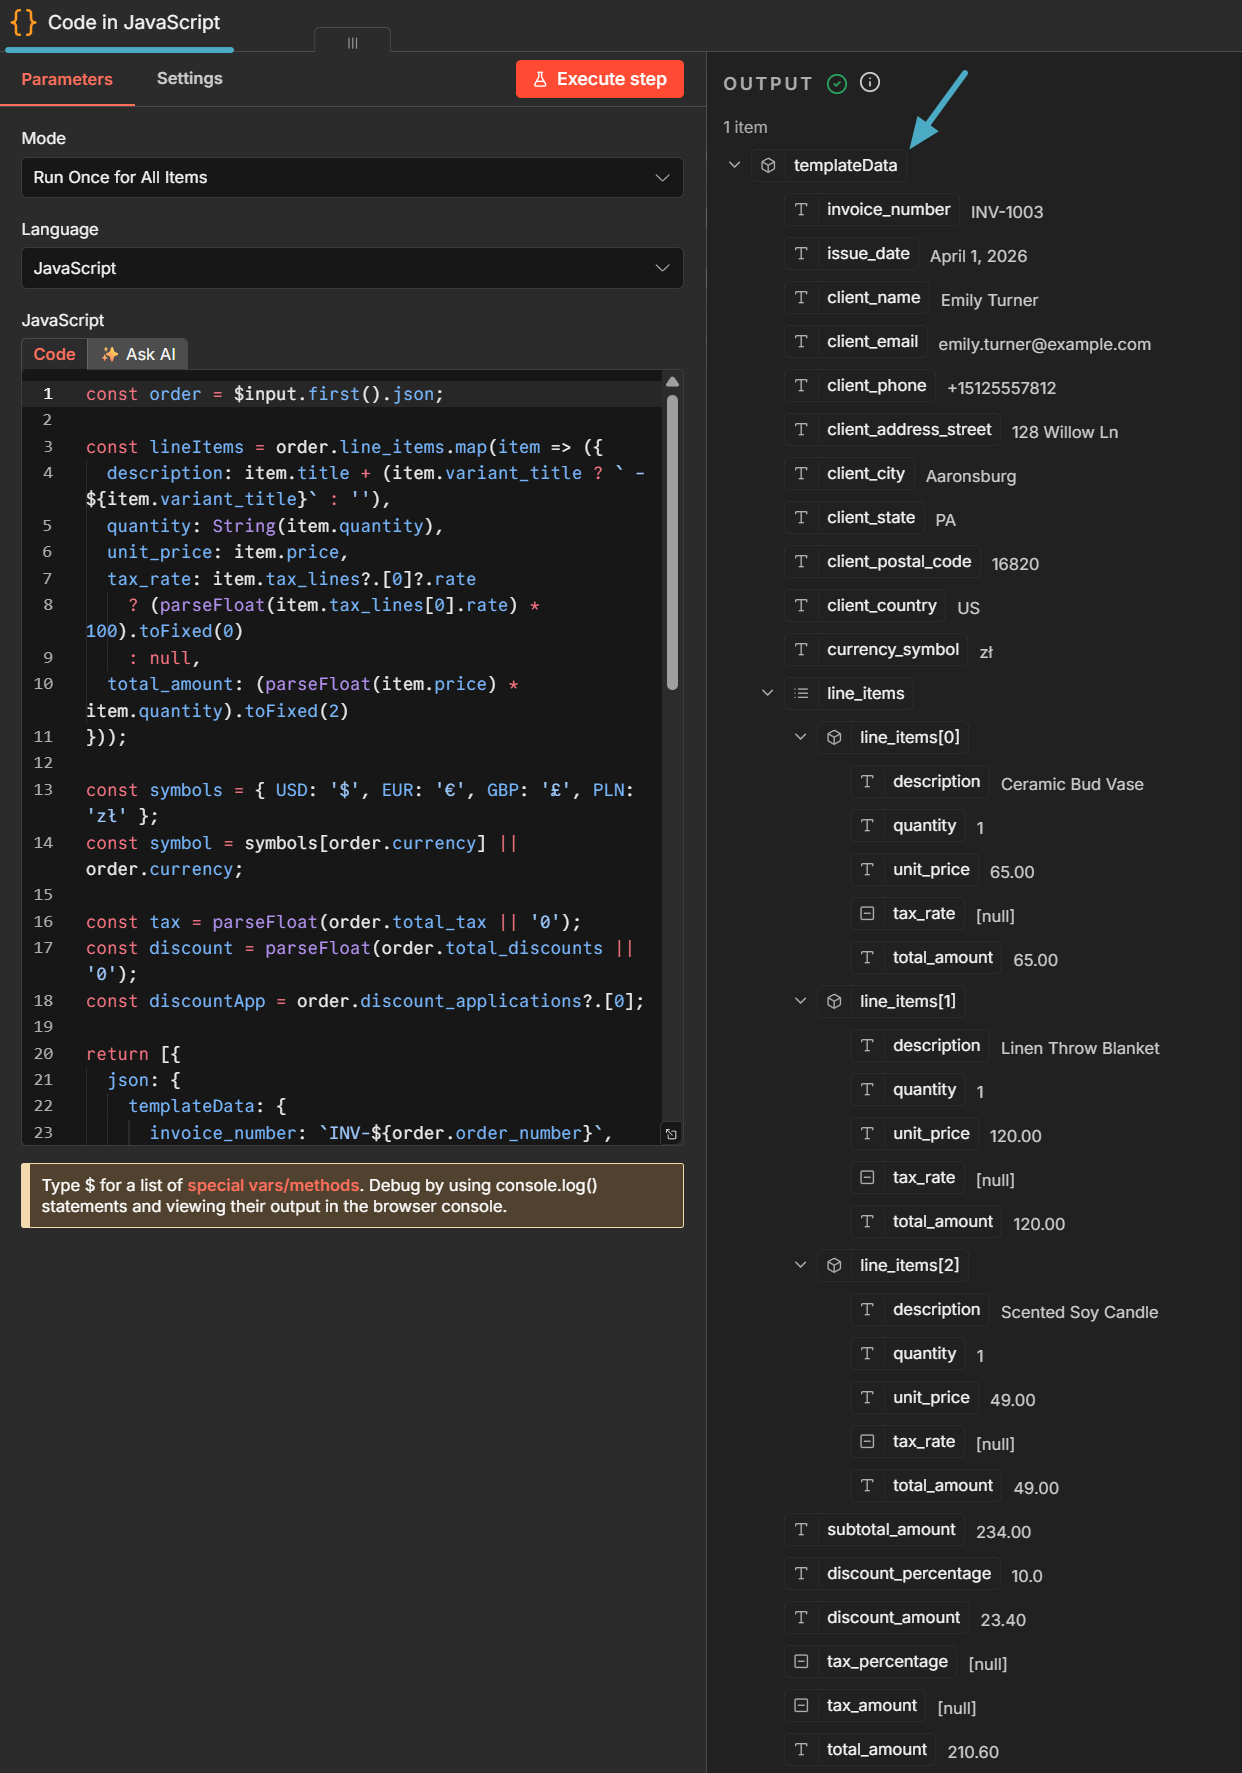
Step 2: Map Shopify Data
Add a Code node after the Shopify Trigger. Shopify's order object has different field names and data formats than your PDFBolt template expects:
const order = $input.first().json;

const lineItems = order.line_items.map(item => ({
  description: item.title + (item.variant_title ? ` - ${item.variant_title}` : ''),
  quantity: String(item.quantity),
  unit_price: item.price,
  tax_rate: item.tax_lines?.[0]?.rate
    ? (parseFloat(item.tax_lines[0].rate) * 100).toFixed(0)
    : null,
  total_amount: (parseFloat(item.price) * item.quantity).toFixed(2)
}));

const symbols = { USD: '$', EUR: '€', GBP: '£', PLN: 'zł' };
const symbol = symbols[order.currency] || order.currency;

const tax = parseFloat(order.total_tax || '0');
const discount = parseFloat(order.total_discounts || '0');
const discountApp = order.discount_applications?.[0];

return [{
  json: {
    templateData: {
      invoice_number: `INV-${order.order_number}`,
      issue_date: new Date(order.created_at).toLocaleDateString('en-US', {
        year: 'numeric', month: 'long', day: 'numeric'
      }),
      client_name: order.customer
        ? `${order.customer.first_name} ${order.customer.last_name}`
        : order.billing_address
          ? `${order.billing_address.first_name} ${order.billing_address.last_name}`
          : 'Customer',
      client_email: order.customer?.email || order.email,
      client_phone: order.customer?.phone || order.phone,
      client_address_street: order.billing_address?.address1,
      client_city: order.billing_address?.city,
      client_state: order.billing_address?.province_code,
      client_postal_code: order.billing_address?.zip,
      client_country: order.billing_address?.country_code,
      currency_symbol: symbol,
      line_items: lineItems,
      subtotal_amount: order.total_line_items_price || order.subtotal_price,
      discount_percentage: discountApp?.value_type === 'percentage'
        ? discountApp.value
        : null,
      discount_amount: discount > 0 ? order.total_discounts : null,
      tax_percentage: order.tax_lines?.[0]?.rate
        ? (parseFloat(order.tax_lines[0].rate) * 100).toFixed(0)
        : null,
      tax_amount: tax > 0 ? order.total_tax : null,
      total_amount: order.total_price
    }
  }
}];
The keys in templateData must match your PDFBolt template's Handlebars variables exactly – a mismatch means an empty field on the PDF. Also, Shopify orders only contain customer and order data. If your template shows company name, address, logo, or payment info, add those as hardcoded values in the same object.
Run the workflow once with a test order and check the Code node output before going live. Field names in the Shopify order object may vary depending on your store configuration.
Steps 3–5: Generate, Email, Archive
These steps are identical to the Stripe workflow. Add a PDFBolt node, a Gmail node, and optionally a Google Drive node with the same configuration described in Workflow 1, Step 3.
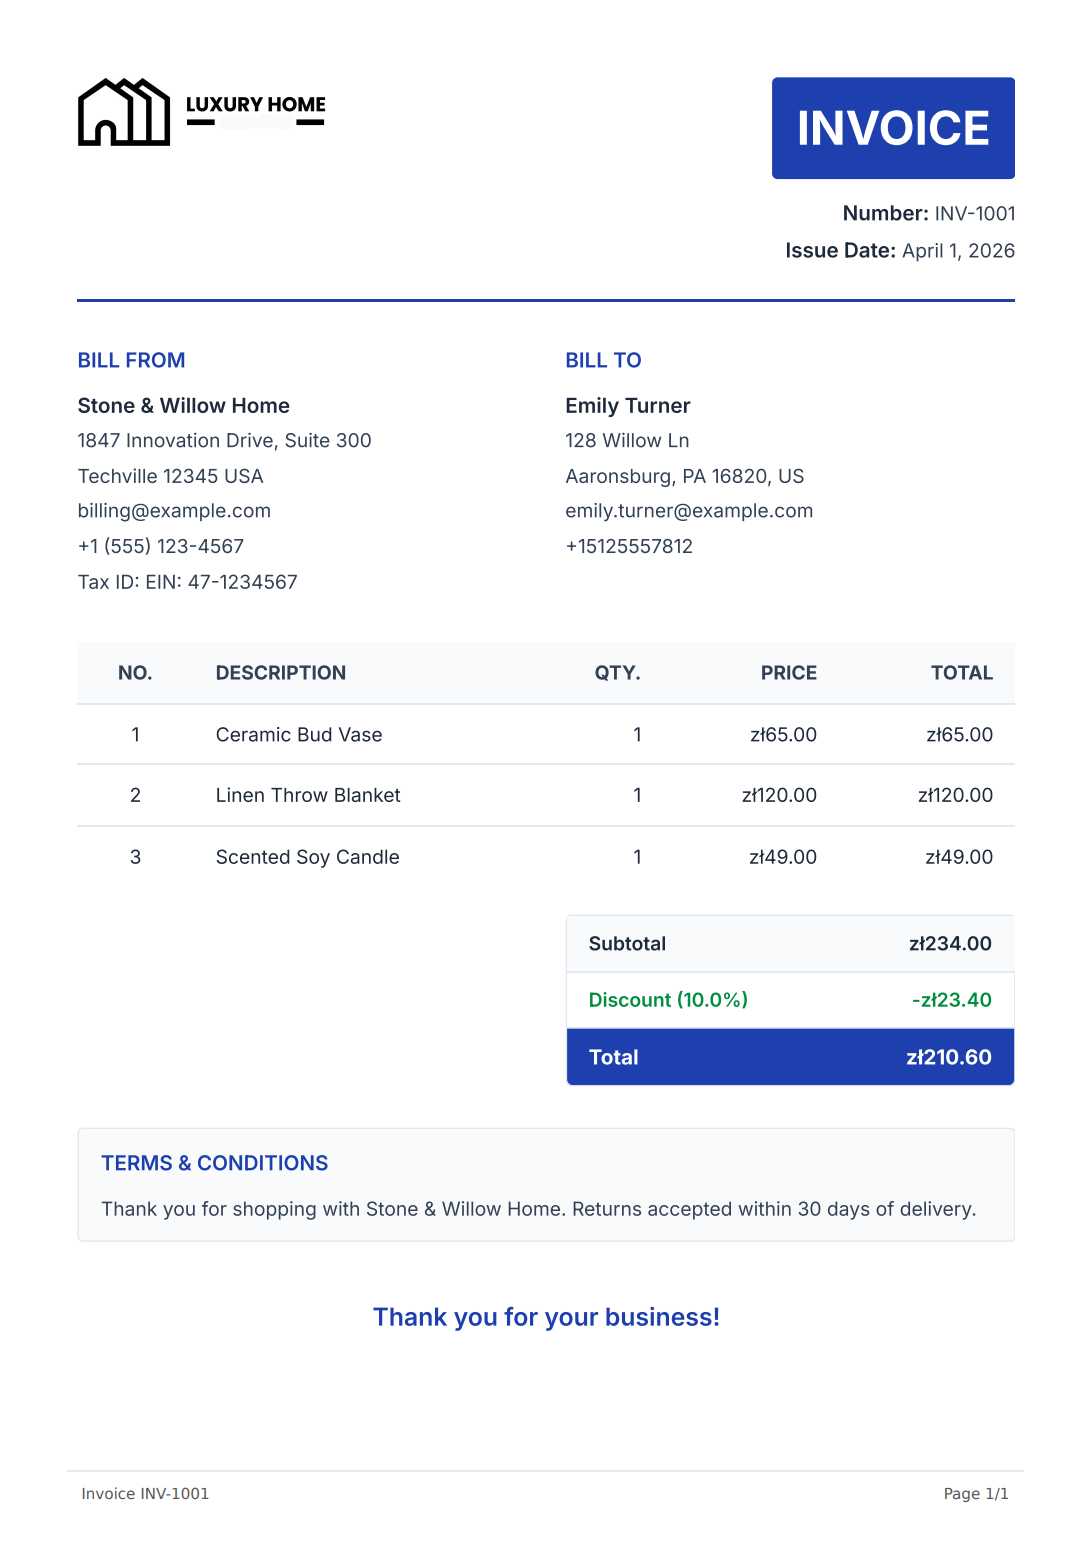
Here's the generated invoice with the Shopify order data:
Other Triggers for Automated Invoice Generation
The two workflows above cover the most common e-commerce scenarios. Here are a few other triggers that work well for invoices:
| Trigger | Invoice Scenario |
|---|---|
| WooCommerce Trigger | WordPress e-commerce store – same pattern as the Shopify workflow above |
| Webhook | Custom billing system or payment processor not natively supported by n8n |
| Schedule | Monthly retainer invoices or recurring service billing on a fixed schedule |
| Google Sheets | Sales team manages invoice data in a spreadsheet – generate PDFs when a new row is added |
The pattern stays the same: trigger fires, Code node maps data to template fields, PDFBolt generates the PDF, email delivers it.
Batch Invoice Generation
If you need to generate dozens or hundreds of invoices at once (monthly billing runs, end-of-period statements), use n8n's Loop Over Items node to process them one by one. Fetch your invoice data from a database or spreadsheet, loop through each row, and run the PDFBolt + Gmail steps for each item.
A few things to keep in mind for batch runs:
- Check your plan's rate limits. If needed, set the Loop Over Items batch size to 1 and add a Wait node (a few seconds) inside the loop to space out API calls.
- In the PDFBolt node's Settings tab, set On Error to Continue (using error output) so one failed invoice doesn't stop the whole batch.
- For 100+ invoices, consider the Async endpoint. It processes PDFs in the background and delivers results via webhook callback, which avoids workflow timeouts.
Archiving Invoices for Compliance
Depending on your jurisdiction, you may need to store invoices for several years. A few archiving patterns that work with n8n:
Google Drive or Dropbox. Add a storage node after the PDFBolt node. The Direct endpoint returns binary data, so you can both email and upload the PDF in the same workflow. Use the filename option in the PDFBolt node to set a meaningful name like the invoice number (e.g., INV-2026-0331) and organize files into folders by year or month in your storage node.
S3 or S3-compatible storage. Set the Custom S3 Presigned URL option on the Sync or Async endpoint to have PDFBolt upload the PDF directly to your bucket. PDFBolt handles the upload, so no binary data passes through n8n. This is a separate flow from the Direct endpoint used in this guide.
FAQ
Which PDFBolt endpoint should I use for invoices?
Use Direct (PDF in Response) for most invoice workflows. It returns the PDF immediately as binary data, which you can attach to emails and upload to storage in the same workflow. Use Sync (PDF via URL) if you need a download URL instead of binary data. Use Async (PDF via Webhook) for batch processing. It queues the conversion and sends the result to a webhook when ready. See API endpoints for details.
My PDF has blank fields. What's wrong?
The keys in your Template Data must match the Handlebars variable names in your PDFBolt template exactly. If the template uses {{invoice_number}}, the data must include "invoice_number", not "invoiceNumber" or "InvoiceNumber". Check the template data docs.
How do I handle multi-currency invoices?
Map the currency symbol in the Code node based on the currency code from your payment platform. The example code in this guide includes a basic lookup (usd → $, eur → €). For a production setup, extend the lookup object with all currencies you support. Your template just displays whatever currency_symbol value you pass.
Can I add my company logo and branding?
Yes. Design your invoice template in PDFBolt's template designer with your logo, colors, and fonts. The template is stored in PDFBolt. Your n8n workflow only sends the data (client name, amounts, line items). Every generated invoice uses the same branded layout.
What if a payment event fires but the invoice generation fails?
The workflow stops at the PDFBolt node and the email won't be sent. The most common cause is a wrong or unpublished template – double-check that you pasted the correct Template ID and that you clicked Publish in the PDFBolt template designer. The error handling docs list all error codes.
How do I attach the generated PDF to an email in n8n?
The PDFBolt node with the Direct endpoint stores the generated PDF as binary data (field name data). In the Gmail node, click Add Option > Attachments > Add Attachment and set Attachment Field Name to data. The PDF will be attached automatically.
Conclusion
The two workflows in this guide cover the most common automated invoicing scenarios: Stripe payments and Shopify orders. The pattern is always the same: payment trigger, data mapping, PDF generation with PDFBolt, email delivery. The same approach works with any other trigger from the table above. You can start with a template from the PDF template gallery, customize it to match your brand, wire up the Stripe or Shopify trigger, and test with a sample payment. Once the basic workflow runs, add Google Drive archiving or Slack notifications as needed. The free plan includes 100 PDFs per month, enough to test the full workflow.
If you want to generate invoices from code instead of n8n, see the invoice PDF API guide with Node.js and Python examples. For the HTTP Request node approach, see the PDF automation guide. For the full community node reference, see the n8n integration guide. PDFBolt also integrates with other automation platforms like Zapier and Make.
If this workflow starts firing every few seconds, don't fix it – that's just good business. 💰